
How To Fix Hp Laptop Keyboard Keys Not Working
Have you ever wondered, “How to fix HP laptop keyboard keys not working?” Well, you’re not alone. Many HP laptop users face this issue. It can be a serious roadblock, especially when you rely on your laptop for work or studies. But don’t worry! We’ve got you covered. This comprehensive guide will walk you through the possible causes and solutions for this common problem.
Common Reasons Why HP Laptop Keyboard Keys Not Working
Let’s delve into the common reasons why your HP laptop keyboard might stop working. First off, we have to consider hardware issues. Dirt is a ubiquitous problem that can accumulate under your keys, causing some keys to stop functioning. Adding to this, liquids spilling on your keyboard can also lead to issues. The residue dries and holds the keys down, rendering them unresponsive.
Moreover, don’t forget the wear and tear factor. Over time, keys can get worn out and they might not register your keystrokes. Now that we’ve examined hardware issues, let’s move to software problems. Outdated keyboard drivers are a common issue that can lead to your keyboard acting up.
Incorrect keyboard settings, too, can be a culprit. They may cause certain keys to stop working. Furthermore, a nasty malware or virus infection can disable some, or even all of your keys.
Lastly, we can’t ignore laptop-specific problems. Some HP laptop models might have unique issues. In some cases, a design flaw might affect the keyboard’s functionality. In others, a firmware update could render some keys unresponsive.
So, there you have it. These are some of the reasons why your HP laptop keyboard might stop working. Understanding these problems is the first step to fixing them.
How to Fix HP Laptop Keyboard Keys Not Working
Understanding the problem is only half the battle. The next step is to fix it. Let’s start with hardware fixes.
a) Cleaning your keyboard is a simple yet effective solution.
- Prepare your workspace: Start by setting up a clean, well-lit workspace. This way, you can see and access your keyboard easily.
- Turn off your laptop: Before you start, it’s vital to turn off your laptop. Doing so protects it from accidental key presses or static electricity.
- Use a soft brush: Get a soft brush, like a paintbrush or a makeup brush. Gently brush the keys and spaces between them. This action helps to dislodge dust and debris.
- Shake the laptop gently: Next, hold your laptop upside down. Give it a gentle shake. This step further removes loose debris.
- Use compressed air: For stubborn dirt, grab a can of compressed air. Hold it at a slight angle and spray between the keys. This blows away any remaining dust or dirt.
- Clean the keys: Dampen a microfiber cloth with a little isopropyl alcohol. Wipe the surface of the keys. This removes oils and grime. Make sure the cloth is damp, not wet, to avoid liquid getting into the laptop.
- Let it dry: Before turning your laptop back on, let it dry completely. This prevents possible damage from residual moisture.
b) Next, let’s talk about stuck keys.
Stuck keys can be quite a nuisance. So, let’s explore how to deal with them.
- The initial step is simple. Try to gently wiggle the key. A light touch often does the trick. It can free the key from the residue holding it down.
- If the key remains stuck, don’t despair. It might need removal for a deeper clean. Before you proceed, take caution. Check your laptop’s manual. It will provide instructions for safe key removal.
- After consulting your manual, gently pry the stuck key. A flat-head screwdriver can help. Yet, don’t apply too much force. You want to avoid damaging the key.
- With the key removed, it’s cleaning time. Start by inspecting the area underneath. Is there a visible residue? If yes, a soft cloth should clean it. You can dampen the cloth with isopropyl alcohol for a better clean. Remember to dry the area thoroughly before proceeding.
- Once cleaned, it’s time to replace the key. Align the key with its place on the keyboard. Press down gently until it clicks into position. Test the key to ensure it’s working correctly.
Still, the key might not work after cleaning.
In such cases, you may need a replacement key. You can purchase this online. Check your laptop model to ensure you order the correct key.
So, dealing with stuck keys can require patience. But with careful cleaning and possible replacement, it’s doable. Remember, always refer to your laptop’s manual. It’s your best guide to avoid causing further damage.
c) Now, what about worn-out keys?
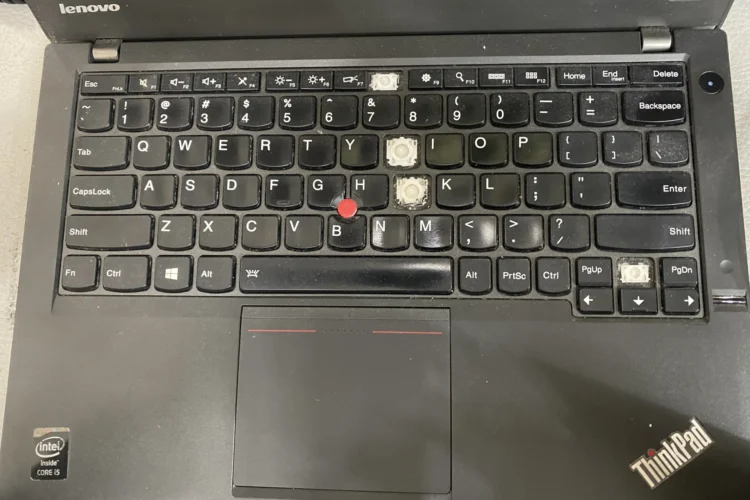
Missing keys on a Lenovo ThinkPad laptop keyboard, showcasing the need for repair or replacement.
Worn-out keys are a common issue. They’re often the result of heavy use over time. If a key is worn out, replacing it might be the best option. But how do you go about this?
First, you need to get a replacement key. You can find these online on websites such as Amazon or eBay. Alternatively, you can directly contact HP for official replacement keys. When purchasing, be sure to check that the key is compatible with your laptop model.
To install the new key, start by referring to your laptop’s manual. This manual provides specific instructions for your laptop model. These steps ensure you replace the key safely, without causing damage.
Here’s a general guide to replacing a key:
- Remove the worn-out key. Use a flat-head screwdriver to gently pry it off.
- Be careful not to damage the retainer clip underneath. This clip holds the key in place.
- Once the key is off, place the new key over the retainer clip.
- Press down gently until the key clicks into place.
However, replacing keys can be tricky. If you’re not comfortable doing it yourself, consider visiting a repair shop. Professionals can handle the replacement quickly and safely. They have the right tools and knowledge to avoid causing further damage.
Remember, when in doubt, it’s best to seek professional help. It ensures you get a fast, safe, and effective solution for your worn-out keys.
d) Moving on to software fixes, we begin with updating keyboard drivers.
- Start by pressing the ‘Windows’ key and the ‘X’ key together on your keyboard. This opens a menu. From this menu, select ‘Device Manager’.
- In the Device Manager, you will see a list of all the hardware connected to your laptop. Scroll down this list until you find the category labeled ‘Keyboards’. Click on the arrow next to ‘Keyboards’. This action expands the category.
- Now, you should see your keyboard listed. It might be named something like ‘Standard PS/2 Keyboard’. Right-click on this option.
- After right-clicking, a menu will appear. From this menu, select ‘Update driver’.
- A new window will open. Choose the option that says ‘Search automatically for updated driver software’. Your laptop will now search the internet for the latest driver for your keyboard and install it.
- After the update is complete, restart your laptop. This ensures the changes take effect.
By updating your keyboard drivers regularly, you can keep your keyboard functioning smoothly. Remember, outdated drivers are a common cause of keyboard problems. So, it’s worth checking for updates every now and then.
c) Incorrect keyboard settings can also lead to problems.
Here is a step-by-step guide to checking and changing your keyboard settings
- Start by pressing the ‘Windows’ key and the ‘R’ key together on your keyboard. This will open the ‘Run’ dialog box. Type ‘control panel’ into the box and hit ‘Enter’. This will open the Control Panel.
- In the Control Panel, you will see several categories. Look for the one labeled ‘Clock and Region’ and click on it. In the next window, select ‘Region and Language’.
- You should now see a dialog box with several tabs. Select the ‘Keyboards and Languages’ tab.
- In the ‘Keyboards and Languages’ tab, you will see a button labeled ‘Change keyboards’. Click on this button.
- You will now see a window titled ‘Text services and input languages’. Here, you can see the current default language of your keyboard. If it’s not the correct one, click on ‘Add’. From the list, select the correct language and click ‘OK’.
- After you’ve chosen the correct language, click ‘Apply’, then ‘OK’ to close the dialog box.
By ensuring your keyboard settings are correct, you can prevent many keyboard-related issues. Remember, the settings should match the physical layout of your keyboard for the best typing experience.
d) Malware or viruses can cause keyboard issues too.
Malware or viruses can indeed cause keyboard issues. Therefore, running a full system scan using reliable antivirus software is important. This process will help you find and remove any harmful software that might be affecting your keyboard’s functionality.
There are several reliable antivirus programs available. Here are a few suggestions:
- Norton Antivirus: Norton offers various levels of protection and has been a trusted name in the antivirus space for many years. You can check their options at www.norton.com.
- McAfee: Another reliable antivirus software, McAfee provides comprehensive protection against malware and viruses. Visit their website at www.mcafee.com.
- Bitdefender: Bitdefender offers robust protection and has a user-friendly interface. They provide a range of options to suit different needs. You can explore more at www.bitdefender.com.
- Avast: Avast provides a free antivirus program that offers solid protection against viruses and malware. You can upgrade to their premium options for more features. Visit www.avast.com to know more.
Remember, it’s crucial to keep your antivirus software updated for the best protection. And always, run regular scans to catch and remove any threats early.
Let’s dive into 7 specific issues commonly encountered with HP laptop keyboards
a) Keyboard Not Responding:
- Shut down your laptop.
- Turn on the laptop and immediately press the esc key several times to open the Startup Menu.
- If the Startup Menu doesn’t open, it could mean your integrated keyboard hardware is not working. It might need servicing or replacement. You can use a USB keyboard as a temporary solution.
- If the Startup Menu opens, press f10 to open the BIOS settings.
- Press f5 to load the default settings, and then f10 to accept changes.
- Restart your laptop. Then, open the Device Manager in Windows.
- Select View > Show hidden devices. Find your keyboard under the Keyboards category.
- Right-click on your keyboard name, then click Uninstall to remove the device.
- Restart your laptop again. Your keyboard should now work correctly.
b) Slow Key Response:
This could be due to the Filter Keys function.
- Search for
Accessibilityin Windows, then select Keyboard. - Disable the Use Filter Keys option and uncheck the box for Allow the shortcut key to start Filter Keys.
- Your keys should now be more responsive.
c) Multiple Characters from One Key Press:
You’ll need to adjust the key repeat delay.
- Search for and open
keyboardto open Keyboard Properties in Windows. - Drag the Repeat delay slider to Long, then click Apply and OK.
- Your keyboard should now work as expected.
d) Function Keys Not Working:
The function key driver may need replacing.
- Visit the HP Customer Support – Software and Driver Downloads page and identify your computer model.
- Look for keyboard drivers, then select the HP Wireless Button Driver or HP Hotkey Support driver.
- Download and install the driver. Your function keys should now work.
e) Beeping While Typing:
This could be due to Toggle Keys or Sticky Keys being active.
- Search for
Accessibilityin Windows, then select Keyboard. - Disable both Use Sticky Keys and Use Toggle Keys.
- Your keyboard should no longer beep when you type.
f) Wrong Characters Displayed When Typing:
You might need to synchronize Windows to the keyboard language or layout you’re using.
- Search for and open Edit language and keyboard options in Windows.
- Check your default language. If it’s incorrect, add the right language and set it as default.
- Click More next to the language, select Language options, then Add a keyboard.
- Select the correct keyboard layout. Your keyboard should now work as expected.
g) Sticky Notebook Key:
A sticky key might need to be removed and cleaned.
But if your laptop is under warranty, don’t try to remove the key yourself. Instead, contact HP for service.
Always remember to refer to your laptop model’s manual or consult HP’s website before attempting any fixes. They provide the most accurate and specific guidance.
When to Seek Professional Help To Fix Hp Laptop Keyboard Keys Not Working
If you’re unable to resolve your HP laptop keyboard issue using the steps mentioned above, it’s recommended to seek assistance from a reliable laptop repair shop.
In Singapore, Volta PC Upgrade & Repair is an excellent choice. They offer free diagnostic services, allowing their skilled technicians to identify the root cause of the problem with your laptop keyboard.
With their expertise in laptop repairs and upgrades, you can trust them to provide reliable and efficient solutions for your HP laptop keyboard.
Visit this page for more on laptop keyboard replacement singapore.
Conclusion
In conclusion, knowing how to fix HP laptop keyboard keys not working is a valuable skill. It can save you time and the expense of replacing your laptop.
However, if the problem persists despite trying these solutions, it’s time to seek professional help.
Consider reaching out to VOLTA PC Upgrade & Repair in Singapore. They are experts in handling such issues and can provide an efficient solution on how to fix HP laptop keyboard keys not working.
Address:
- Tai Seng Branch: 8 Burn Road #01-04, Trivex, Singapore 369977
- Jurong Branch: Blk 132 #01-279C, Jurong Gateway Road, Singapore 600132