
7 Proven Fixes For MacBook Not Picking Up Wifi
If you’ve found yourself frustrated because your MacBook is not picking up Wifi, you’re not alone. This is a common issue that many MacBook users face, but the good news is that it’s often solvable with the right steps. In this guide, we’ll walk you through a series of proven fixes to get your MacBook back online and running smoothly. From verifying your Wi-Fi connection to seeking professional help, we’ve got you covered. Let’s dive in and get that Wi-Fi working again!
7 Proven Fixes For MacBook Not Picking Up Wifi
1. Verify Your Wi-Fi Connection
First and foremost, let’s tackle the basics. You might think you’re connected to Wi-Fi, but are you? Verifying your Wi-Fi connection is the initial step in troubleshooting. So, let’s dive in.
Check the Network Name
Firstly, ensure you’re connected to the correct network. Many people have multiple networks at home or work. For example, you might have a guest network in addition to your primary one. To check, click on the Wi-Fi icon at the top right corner of your MacBook screen. A list of available networks will appear. Make sure you’re connected to the right one.
Signal Strength Matters
Secondly, look at the signal strength. A weak signal can cause connectivity issues. If you see fewer than three bars, consider moving closer to the router. A strong signal usually ensures a stable connection.
The Dreaded Exclamation Mark
Moreover, an exclamation mark next to your Wi-Fi symbol is a red flag. This symbol means you’re connected to the router but not to the internet. In this case, you’ll need to dig deeper to find the issue.
Forget and Reconnect
Additionally, forgetting the network and reconnecting can solve minor glitches. To do this, go to ‘System Preferences,’ then ‘Network.’ Select ‘Wi-Fi’ and click on ‘Advanced.’ From there, choose the network you want to forget and click the minus button. Finally, reconnect by selecting your network and entering the password.
DNS Handshake
Furthermore, a DNS handshake issue can disrupt your connection. If you see the Wi-Fi symbol with an exclamation mark, it’s likely a DNS issue. To resolve this, you can switch between your regular and 5GHz network. Sometimes, a simple switch can restore your connection.
Quick Tips
Lastly, here are some quick tips. Always make sure your Wi-Fi is turned on. It sounds simple, but you’d be surprised how often this is the issue. Also, try connecting to another network. If it works, the problem likely lies with your primary network.
2. Restart Your MacBook
Next on our troubleshooting list is restarting your MacBook. Surprisingly, this simple action can solve a myriad of issues, including Wi-Fi connectivity problems. So, let’s explore why and how to do it effectively.

Why Restarting Helps
Firstly, restarting your MacBook refreshes the system. It clears temporary files and stops all processes. This action often resolves minor glitches that could be affecting your Wi-Fi.
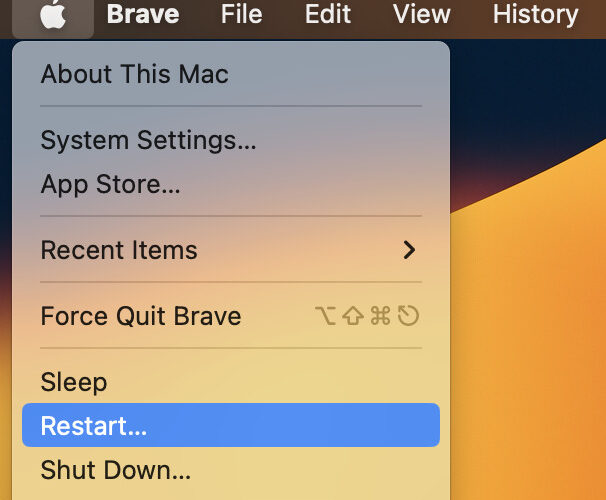
Steps to Restart
Secondly, let’s go through the steps. Click on the Apple logo in the top-left corner of your screen. A dropdown menu will appear. Choose “Restart” from the options. Your MacBook will then go through the restart process.
Renewing the IP Address
Moreover, restarting automatically renews your IP address. An IP address is like your computer’s home address on the internet. Sometimes, conflicts arise if multiple devices share the same IP address. Restarting resolves this by assigning a new IP address to your MacBook.
DHCP Lease Renewal
Furthermore, you can manually renew the DHCP lease. DHCP stands for Dynamic Host Configuration Protocol. It’s what assigns IP addresses within your network. To manually renew it, go to ‘System Preferences,’ then ‘Network.’ Choose ‘Wi-Fi’ and click ‘Advanced.’ Navigate to the ‘TCP/IP’ tab and click ‘Renew DHCP Lease.’
Check for Improvements
Additionally, after restarting, check your Wi-Fi connection. Open a browser and try loading a few web pages. If they load without issue, the restart likely solved the problem.
When to Restart Again
However, if the problem persists, consider another restart. Sometimes, it takes more than one attempt to resolve the issue. Also, try disconnecting other devices from the Wi-Fi to see if that helps.
Quick Tips
Lastly, here are some quick pointers. Always save your work before restarting. You don’t want to lose any important data. Also, close all apps to allow for a smooth restart process.
3. Check Date and Time Settings
Moving on, let’s focus on an often-overlooked aspect: your MacBook’s date and time settings. Believe it or not, incorrect settings can affect your Wi-Fi connectivity. Let’s delve into why this matters and how to fix it.
The Importance of Accurate Settings
Firstly, accurate date and time settings are crucial for network protocols. They ensure proper communication between your MacBook and the router. Incorrect settings can disrupt this communication.
How to Check Settings
Secondly, checking these settings is straightforward. Navigate to the Apple menu, then click on ‘System Preferences.’ From there, select ‘Date & Time.’ You’ll see options for setting the date and time automatically or manually.
Automatic vs. Manual Settings
Moreover, you have two options: automatic and manual. Automatic settings sync your MacBook with a network time server. On the other hand, manual settings require you to input the date and time yourself. Both have their pros and cons.
Location Services
Additionally, your MacBook can set the time zone automatically based on your location. However, you’ll need to enable Location Services for this feature to work. It’s a handy option if you travel frequently.
Quick Fixes
Furthermore, if you notice any discrepancies, correct them immediately. Turn off the ‘Set date and time automatically’ option if it’s on. Then, set the date and time manually and click ‘Set.’
Potential Issues
Lastly, be aware that incorrect date and time settings can also affect other functionalities. For example, they can cause issues with email timestamps and file saving. Therefore, it’s best to keep them accurate.
4. Examine VPN and Security Software
Continuing our journey to solve Wi-Fi issues, let’s focus on VPN and security software. These programs can sometimes interfere with your Wi-Fi connectivity. So, let’s understand why and how to address it.
The Role of VPN and Security Software
Firstly, VPN and security software monitor or interact with your network connections. These programs can affect your internet access. Therefore, it’s crucial to examine them when facing Wi-Fi issues.
Types of Software to Check
Secondly, you should look for various types of software. These include VPN apps, firewall apps, anti-virus apps, and even parental control apps. Each can have settings or restrictions that disrupt connectivity.
How to Check for VPN and Security Software
Moreover, checking for these programs is simple. Navigate to your Applications folder in Finder. Look for any software that falls under the categories mentioned above.
Disabling VPN Temporarily
Additionally, consider disabling your VPN temporarily. This action can help you determine if the VPN is the culprit. If your Wi-Fi works fine without the VPN, you’ve found the issue.
Adjust Security Software Settings
Furthermore, you may need to adjust the settings of your security software. Some programs have a “Whitelist” or “Safe List” where you can add trusted networks. Adding your Wi-Fi network here can sometimes resolve issues.
Uninstalling as a Last Resort
However, if all else fails, you might need to uninstall the software. But be cautious. Uninstalling could affect other functionalities of your device. Always read the software guidelines before taking such a drastic step.
Quick Tips
Lastly, always ensure your software is up-to-date. Software developers often release updates that fix bugs and improve compatibility. So, keeping your software updated can prevent many issues.
5. Utilize Built-in Diagnostic Tools
Next, let’s delve into the built-in diagnostic tools your MacBook offers. These tools can be a lifesaver when you’re facing Wi-Fi issues. So, let’s explore how to use them effectively.
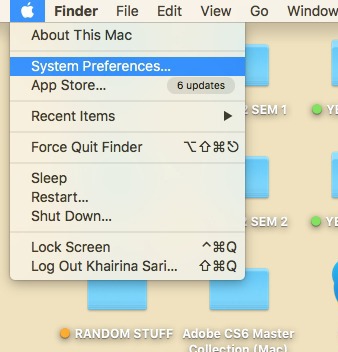

Accessing System Preferences
Firstly, you’ll need to access the ‘System Preferences’ on your MacBook. To do this, click on the Apple menu located in the top-left corner of your screen. From the dropdown, select ‘System Preferences.’
Navigating to Network Settings
Secondly, in the ‘System Preferences’ window, you’ll find an option labeled ‘Network.’ Click on it to proceed.
Selecting Wi-Fi
Moreover, a list of available network connections will appear on the left-hand side. Here, you should select ‘Wi-Fi.’
Advanced Settings
Furthermore, you’ll notice an ‘Advanced’ button in the bottom-right corner. Clicking on this will open a new window with more options.
The “Assist Me” Feature
Additionally, within the ‘Advanced’ window, navigate to the ‘Wi-Fi’ tab. At the bottom, you’ll find a button labeled ‘Assist Me.’ Clicking on this will open another window.
Launching Diagnostics
Importantly, in this new window, you’ll see an option for ‘Diagnostics.’ Click on it to launch the built-in Wi-Fi diagnostic tool.
Following On-Screen Instructions
Once the diagnostic tool is open, follow the on-screen instructions. These steps will help you identify and fix common Wi-Fi problems. If the tool doesn’t resolve the issue, further steps may be necessary.
When to Contact Support
However, if the built-in tool doesn’t solve your problem, don’t lose hope. You may need to contact Apple Support or consult with a technical professional for more advanced troubleshooting.
Quick Tips
Lastly, always ensure your macOS is up-to-date. Software updates often include fixes for common issues, including Wi-Fi connectivity problems.
6. Update Your Wi-Fi Router
As we move forward, let’s focus on another crucial aspect: updating your Wi-Fi router. An outdated router can be the hidden culprit behind your Wi-Fi woes. So, let’s learn how to keep it updated for optimal performance.
Why Update Your Router?
Firstly, updating your router ensures you have the latest security patches and performance improvements. Keeping your router’s firmware up-to-date is highly recommended for a stable connection.
Checking for Updates
Secondly, to check for updates, you’ll need to access your router’s admin settings. These settings are usually found on the back of the router. They include an IP address (like 192.168.x.xxx) along with a username and password.
Logging into Admin Panel
Moreover, open a web browser and type the IP address into the URL bar. Log in using the username and password provided on the router. Once logged in, navigate to the firmware or update section.
How to Update
Furthermore, if an update is available, there will be an option to download and install it. Follow the on-screen instructions to complete the update. Make sure not to interrupt the process, as it could corrupt the router’s firmware.
Post-Update Steps
Additionally, after the update, it’s a good idea to restart your router. This action ensures that all the new settings take effect. Simply press the on/off button on the back of the router to turn it off and on again.
When to Contact Support
However, if you encounter issues during the update, it’s best to contact your router’s customer support. They can guide you through the troubleshooting process and help resolve any issues.
Quick Tips
Lastly, always make sure to read the update notes. These notes often contain valuable information about what the update fixes or improves. So, it’s worth taking a few minutes to go through them.
7. Try a Different Network or Contact Your ISP
As we near the end of our troubleshooting journey, there’s one more avenue to explore. What if you’ve tried all the above steps and still can’t connect? In that case, it’s time to try a different network or contact your Internet Service Provider (ISP). Let’s delve into how to go about it.
Connect to a Different Network
Firstly, try connecting to a different Wi-Fi network. This could be a public Wi-Fi hotspot or even a friend’s network. If you can connect successfully, the issue likely lies with your home network.
Restart Devices
Secondly, don’t underestimate the power of a simple restart. Turn off your Wi-Fi router and the device you’re trying to connect. After a minute, turn them back on. This action can resolve temporary glitches.
Double-Check Wi-Fi Password
Moreover, ensure you’re entering the correct Wi-Fi password. A typo can prevent you from connecting. So, double-check to make sure everything is correct.
Move Closer to the Router
Additionally, if you’re experiencing a weak Wi-Fi signal, try moving closer to the router. A stronger signal can often resolve connectivity issues.
Reset Network Settings
Furthermore, consider resetting your network settings to their default values. This action can resolve software-related issues affecting your Wi-Fi. To do this, navigate to ‘System Preferences,’ then ‘Network,’ and click ‘Advanced.’ From there, you can reset the settings.
Contact Your ISP
However, if all else fails, it’s time to contact your ISP. They can provide further assistance and troubleshoot the problem from their end. Sometimes, the issue might be a larger one that only your ISP can resolve.
8. Additional Tips
Finally, we’ve reached the last section of our guide. Here, we’ll discuss some additional tips that can come in handy when troubleshooting Wi-Fi issues on your MacBook.
Check Wi-Fi Recommendations
Firstly, your MacBook may offer Wi-Fi recommendations. To access this, click the Wi-Fi status icon in the menu bar and choose ‘Wi-Fi Recommendations.’ This feature provides suggestions for improving your Wi-Fi connection.
Inspect Cables and External Devices
Secondly, ensure all cables are properly connected. If you’re using an external modem, double-check the connections. A loose cable can disrupt your internet connection.
Reset Network Devices
Moreover, try resetting your network devices. Unplug your router and modem for a couple of minutes and then plug them back in. This simple step can resolve many connectivity issues.
Check TCP/IP Settings
Furthermore, you can resolve TCP/IP problems through the Network section of System Preferences. Open it, click ‘Advanced,’ and then click the ‘TCP/IP’ tab. If something seems off, select ‘Renew DHCP Lease’ for a basic reset of your network connections.
Remove Interfering Accessories
Lastly, certain accessories and devices in your home could be interrupting your Wi-Fi connection. Especially with newer Macs that have USB-C ports, these can produce opposing signals to the network. Unplug every accessory and reboot your Wi-Fi to check.
FAQs on Macbook not Picking Up Wifi
Why is my Mac not detecting my Wi-Fi?
If your Mac is not detecting your Wi-Fi, it could be due to a variety of reasons. These include outdated router firmware, incorrect date and time settings, or even hardware issues. Start by checking if other devices can connect to the Wi-Fi. If they can, the issue likely lies with your Mac. You may need to update your router or adjust your Mac’s settings.
How do I force my MacBook to connect to Wi-Fi?
To force your MacBook to connect to Wi-Fi, you can try forgetting the network and then reconnecting. Go to ‘System Preferences,’ then ‘Network,’ and select ‘Wi-Fi.’ Click ‘Advanced,’ choose the network you want to forget, and click the minus button. Then, reconnect by selecting your network and entering the password.
Why I Cannot turn on Wi-Fi on my Macbook?
If you can’t turn on Wi-Fi on your MacBook, it could be a software or hardware issue. Try restarting your MacBook first. If that doesn’t work, you may need to reset your network settings. Navigate to ‘System Preferences,’ then ‘Network,’ and click ‘Advanced.’ From there, you can reset the settings.
How do I reset my Wi-Fi settings on my Mac?
To reset your Wi-Fi settings on your Mac, go to ‘System Preferences,’ then ‘Network.’ Select ‘Wi-Fi’ and click ‘Advanced.’ Here, you can remove preferred networks or renew your DHCP lease. Click ‘OK’ and then ‘Apply’ to save the changes.
Why won’t my Mac or iPhone connect to Wi-Fi?
If neither your Mac nor iPhone can connect to Wi-Fi, the issue is likely with your network. Start by restarting your router and modem. If that doesn’t work, you may need to update your router’s firmware or even contact your Internet Service Provider for further assistance.
Why is my computer not connecting to Wi-Fi?
If your computer is not connecting to Wi-Fi, the issue could be with the computer, the Wi-Fi network, or even the router. Start by checking if other devices can connect to the network. If they can, try restarting your computer and updating your network drivers. If the issue persists, you may need to consult with a professional.
When to Seek Professional Help for your Macbook not Picking Up Wifi
Finally, if you’ve tried all the steps outlined above and Macbook still not picking up Wifi, it may be time to seek professional help. Let’s discuss when and where to get expert assistance.
Persistent Issues
Firstly, if you’ve followed all the troubleshooting steps and your Wi-Fi issues persist, it’s a clear sign you need professional help. Some issues may require advanced solutions that only experts can provide.
Complex Problems
Secondly, if you’re experiencing complex problems like frequent disconnections or IP address conflicts, it’s best to consult a professional. M1 and M2 Mac users have reported such issues, which often require expert intervention.
Hardware Issues
Moreover, if you suspect that the problem might be hardware-related, a professional can run diagnostic tests to confirm this. They can also advise on whether a hardware replacement is necessary.
VOLTA PC Upgrade & Repair in Singapore
Additionally, if you’re in Singapore, consider seeking help from VOLTA PC Upgrade & Repair. They specialize in resolving all kinds of MacBook repair services, including Wi-Fi connectivity problems. Their team of experts can provide a comprehensive diagnosis and solution for your MacBook.
Address:
- Tai Seng Branch: 8 Burn Road #01-04, Trivex, Singapore 369977
- Jurong Branch: Blk 132 #01-279C, Jurong Gateway Road, Singapore 600132