Laptop Repair: The Absolute Step-by-Step Guide To Mastering Skill After A Liquid Fiasco
Frequent liquid spills on laptops require proper knowledge of laptop repair techniques to address the aftermath. Accidents happen, and regrettably, liquid spills on laptops are quite common. In fact, they account for a significant portion of laptop repair cases. Consequently, many people face the challenge of dealing with the aftermath of these spills.
Undeniably, the key to minimizing damage is taking swift and appropriate action. Therefore, knowing the right steps for laptop repair after a spill is crucial. Moreover, proper handling can make the difference between saving your device and facing costly consequences.
1. Common Types of Liquid Spills and Their Implications
-
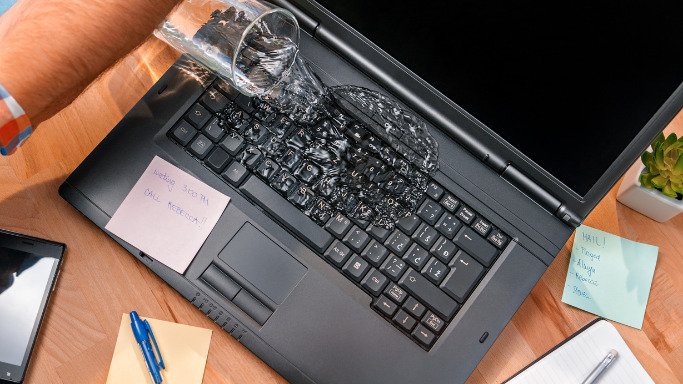
Water spills
Surprisingly, water spills can be less harmful compared to other liquids. Pure water is generally less harmful because it lacks substances that could cause additional damage. However, it can still cause short-circuiting and corrosion if not addressed immediately. However, immediate action is still crucial, as delayed laptop repair can lead to corrosion or short-circuiting.

MacBook Pro with visible water damage
Internal components of a MacBook Pro displaying water damage, with signs of corrosion and moisture on the circuits and hardware
-
Sugary or sticky beverages
Spills involving sugary or sticky drinks, such as soda or coffee, are more problematic. These liquids contain sugars, acids, and other additives that can cause damage beyond just moisture. Sugary residues can lead to sticky components and corrosion, while acids can slowly eat away at internal parts. Consequently, they often require thorough cleaning and possibly replacement of damaged components during laptop repair.
Laptop with keyboard and screen covered in spilled soup
-
Alcoholic beverages
Alcoholic beverages can pose a unique challenge due to their ability to dissolve adhesives and damage plastic components, making laptop repair more complex. Alcohol can dissolve adhesives used in laptops, causing components to come loose. It can also damage plastic components, making the repair process more challenging. Moreover, alcohol evaporates quickly, which could leave behind residues that may interfere with electrical connections.
-
Corrosive liquids
Lastly, corrosive liquids, such as acidic or alkaline substances, are particularly dangerous. Acidic or alkaline substances are particularly harmful as they can cause rapid degradation of the laptop’s internal components. These liquids react chemically with metals and other materials, leading to significant damage or even the complete destruction of components, making repair extremely difficult or impossible. Immediate professional laptop repair is necessary to prevent irreversible damage to internal components.
2. Initial Steps to Take After a Spill
-
Disconnecting power and removing the battery
First and foremost, unplug your laptop from any power source right after a spill. Additionally, remove the battery if possible, to avoid short-circuiting and further complications during laptop repair.
In some cases, laptops may not have an attachable battery and may require tools to open. Removing the battery is crucial to prevent electrical currents from short-circuiting and causing further damage. However, it may require technical skills to safely disconnect the battery, so it’s best to consult a professional or refer to the laptop’s manual for guidance. In the absence of an attachable battery, simply turn off the laptop and unplug it from the power source.
-
Turning off the laptop and keeping it in the right position
Secondly, power off your laptop promptly to halt any electrical activity. Then, position the laptop with the spill area facing down, allowing gravity to assist in preventing liquid from spreading deeper.
-
Blotting excess liquid and assessing the damage
Lastly, gently blot visible liquid from your laptop’s surface using a soft, absorbent cloth. After this initial cleanup, evaluate the extent of the damage to determine the best approach for laptop repair.
-
Do not place your laptop in RICE
It is a popular home remedy to dry out wet electronic devices. The idea is to submerge the device in a container of uncooked rice, which acts as a desiccant, absorbing moisture from the surrounding environment.
However, this method is not ideal for laptops. Disassembling the laptop and using compressed air or a fan to dry components is a more effective approach. Additionally, rice grains and dust can get trapped inside the laptop, potentially causing more harm than good. For a successful laptop repair, it’s best to follow the steps outlined in this guide or seek professional help if necessary.
-
Remove the water immediately if you are able to disassemble the laptop on your own, if not look for a professional as soon as possible
Laptops are made up of metalic components and these components are very susceptible to corrosion. The reason is that copper is used extensively throughout the laptop mainboard and the “good electrical conductor” properties of unique copper alloy used, also cause them to be very susceptible to corrosion (think free electrons) when they come into contact with liquid (worse if its corrosive liquid like coffee or coke).
If you want to try dissambling on your own, please see point 4 below.
3. When to Call in the Experts for Water Damage Laptop Repair?
-
Identifying situations that require expert assistance
Sometimes, a laptop repair may be too complex or risky for a DIY approach. If you’re unsure of your skills or the extent of the damage, it’s wise to consult a professional for help.
Certain liquid spill situations may require professional laptop repair assistance. These situations include:
- Extensive damage: If the spill has affected multiple components or reached deeper parts of the laptop, an expert can better assess and repair the damage.
- Corrosive liquids: Spills involving acidic or alkaline substances can cause rapid degradation, and professionals have the necessary knowledge and tools to handle these situations safely and effectively.
- Inexperience: If you lack experience with laptop disassembly and repair, a professional can ensure proper handling and avoid causing further damage.
- Valuable data: When crucial data is at risk, an expert can take appropriate measures to recover it and prevent data loss during the laptop repair process.
- Warranty concerns: If your laptop is still under warranty, attempting a DIY repair may void it. In such cases, it’s best to consult an authorized service center.
By seeking professional help in these scenarios, you can increase the likelihood of a successful laptop repair and minimize potential risks.
-
Finding a reliable laptop repair service
To find a trustworthy laptop repair service, research local options, read reviews, and ask for recommendations. Ensure the chosen service is certified and experienced in handling your laptop’s specific make and model.
Research local options, read reviews, and ask for recommendations to find a trustworthy laptop repair service. Verify they’re certified and experienced with your laptop’s make and model. For example, in Singapore, VOLTA PC Upgrade and Repair (FKA Budget PC) stands out as a top choice. Boasting around 500 Google reviews, they’ve served over 25,000 customers since 2017.
If you’re confident in your technical skills or simply want a clear understanding of the laptop repair process following a water spill, the upcoming sections are designed to help. We’ve prepared a comprehensive, step-by-step guide to assist you in tackling the laptop repair process safely and effectively. By following these instructions, you can enhance your knowledge and handle the situation with ease.
4. From Spill to Recovery: A Comprehensive Guide to Water Spill Laptop Repair before corrosion sets in
-
Disassembling the Laptop
Before diving into laptop repair, ensure you have the right tools, such as screwdrivers, plastic pry tools, and an antistatic wrist strap. Also, prepare a clean, organized workspace.
To prevent additional harm, follow these precautions: use an antistatic wrist strap to prevent electrostatic discharge, keep screws and parts organized, and refer to your laptop’s disassembly guide.
Step-by-step guide to disassembly
- Firstly, remove all external devices and peripherals.
- Secondly, consult your laptop’s manual for model-specific instructions.
- Next, unscrew and carefully remove the bottom panel.
- Subsequently, disconnect the battery connector from the motherboard.
- After that, remove other components (RAM, SSD, etc.) as necessary, according to the manual.
- Lastly, follow additional disassembly steps based on the affected areas that need laptop repair.
-
Cleaning and Drying the Components
In the laptop repair process, clean each component carefully using appropriate methods. For example, use isopropyl alcohol and a soft brush for circuit boards and a microfiber cloth for screens.
After cleaning, it’s crucial to ensure all components are dry before reassembly. Use compressed air to remove moisture from hard-to-reach areas and leave the parts to air-dry in a well-ventilated space.
During the laptop repair, assess each component for irreparable damage. If you find signs of corrosion, swelling, or burnt areas, it’s likely that the affected part will need replacement to ensure proper functionality.
Use an Absorbent Cloth to Soak up Water from Your Laptop After a Spill. Image credit: Business Insider
- Reassembling and Testing the Laptop
During laptop repair, reverse the disassembly process while following the manufacturer’s guidelines. Carefully reattach and secure each component, ensuring everything is in its proper place.
As you reassemble, double-check all connections and alignments, making certain that cables are properly seated, and screws are tightened. This attention to detail is crucial for a successful repair.
Finally, after reassembly, connect the power and turn on the laptop. Test all functions, including the keyboard, touchpad, screen, and ports, to confirm that the repair was successful and your device is fully functional.
5. Preventative Measures for the Future
To minimize the need for future laptop repair, practice caution around liquids. Keep drinks away from your laptop, avoid working in damp environments, and always close the lid when not in use.
Invest in protective accessories like keyboard covers and laptop sleeves to shield your device from potential spills. Additionally, follow best practices such as regular backups, proper ventilation, and keeping your workspace clean to minimize the likelihood of requiring laptop repair.
Conclusion
In conclusion, handling a laptop repair after a liquid spill can be daunting, but with proper knowledge and swift action, you can minimize damage and potentially save your device. By following the steps outlined in this guide, you’ll be better equipped to assess the situation, clean and dry components, and reassemble your laptop. Remember, if you’re ever uncertain or faced with a complex repair, don’t hesitate to seek professional assistance to ensure the best possible outcome for your laptop repair.
If you’re not a tech expert and want to avoid risks while saving time, reaching out to a professional repair service is a great option. Search for a laptop repair shop near you, but also read reviews to ensure you make the right choice.
For those in Singapore, consider checking out VOLTA PC Upgrade and Repair (FKA BudgetPC). We offer free diagnostics to help you assess the damage and make an informed decision.
The time required for laptop repair after a liquid spill varies depending on the extent of the damage and your technical skills. Typically, the cleaning and drying process alone can take anywhere from 24 to 72 hours to ensure all moisture is removed from the components. Reassembly and testing may take additional time.