Laptops, indispensable tools for work and play, are prone to a variety of screen problems that can disrupt your day-to-day activities. From flickering displays to unresponsive touchscreens, these issues can range from simple glitches to complex hardware failures. Understanding how to troubleshoot common laptop screen problems can save you time and money, but it’s equally important to know when to call in a professional. This article provides insights into identifying, diagnosing, and addressing screen troubles, as well as advice on handling data during repairs and making informed decisions about DIY versus professional services.
Key Takeaways
Complex screen issues like motherboard faults or broken LCDs often require professional expertise to avoid further damage and warranty voidance.
Before attempting any DIY repairs, ensure the laptop is powered off and you are properly grounded to prevent static damage to internal components.
For software-related screen problems, updating drivers and restoring factory settings can be effective solutions that users can perform at home.
Physical screen damage, such as cracks or dead pixels, usually necessitates professional repair or screen replacement for a proper fix.
When considering repair or replacement, assess the cost-benefit aspect and the potential longevity of your laptop to make an economical decision.
Screen and Display Troubles
Identifying Common Screen Issues
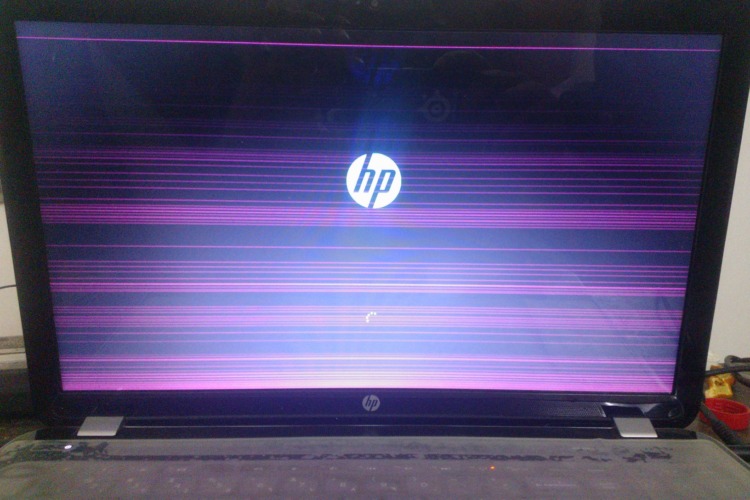
Image of a HP laptop with screen flickering. Image: HP Community Laptop screens can exhibit a variety of problems, each with its own set of symptoms and potential fixes. Identifying the correct issue is crucial for effective troubleshooting. Here are some of the most common screen issues you might encounter:
Screen flickering or unstable flashing, often caused by driver issues or hardware malfunctions.
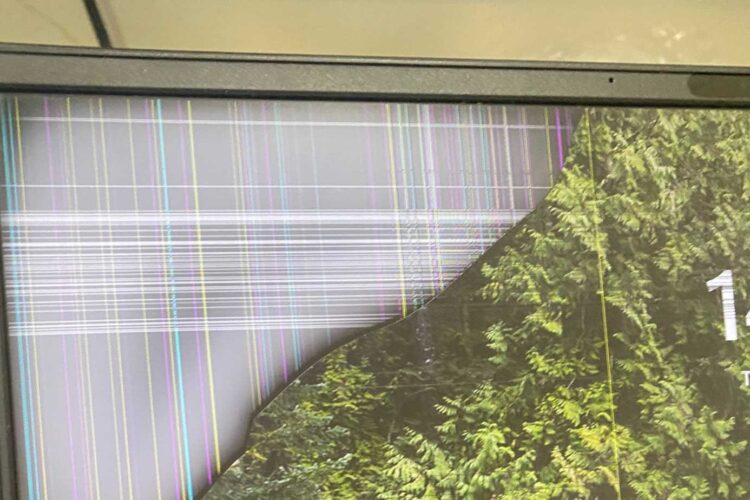
Horizontal or vertical lines that disrupt the display, which may indicate a failing graphics card or a loose video cable.
Noise from the screen on startup, potentially due to moisture or environmental factors.
Dead pixels or unresponsive areas, especially in touchscreens, which might require professional repair.
Cracks on the screen, usually the result of mishandling, often necessitating a screen replacement.
While some issues like updating drivers or adjusting resolution settings can be handled at home, others, such as physical damage, typically require a professional’s touch. It’s important to assess the severity of the problem before attempting any fixes.
Diagnosing Display Problems
When your laptop screen starts acting up, it’s crucial to diagnose the issue accurately to determine the right course of action. Check for driver issues or physical damage as a first step. Symptoms like stuttering images, dead pixels, or cracks can often be resolved with some basic troubleshooting steps:
Update display drivers to ensure compatibility and functionality.
Adjust resolution settings to match the screen’s specifications.
Inspect the screen for any signs of physical damage.
If the problem persists, running a built-in diagnostic test can help identify if the display is functioning correctly. This step is particularly useful for isolating hardware issues from software-related problems.
In cases where the display is unresponsive or has suffered internal circuitry damage, the repair process may be more complex. Loose or poorly connected monitor cables can also cause display issues but are generally simpler to fix. If the screen itself is faulty due to external impacts, professional repair is likely necessary.
When to Opt for Professional Screen Repair
While a do-it-yourself approach to laptop screen repair might be tempting, there are certain scenarios where seeking professional help is the best course of action. Complex problems such as a broken LCD or motherboard issues should be left to the experts. Not only do they have the right tools and expertise, but attempting repairs on your own could lead to further damage or voiding of warranties.
Professional repair services offer a warranty on their work, providing a safety net for your investment.
Here are some benefits of opting for professional repair services:
Expertise in diagnosing and fixing a wide range of computer issues.
Access to specialized tools and testing equipment.
Availability of replacement parts for a quicker repair process.
Reduced risk of additional damage due to inexperience.
Ultimately, deciding if it’s worth to fix your laptop screen through DIY or professional means depends on your skill level, budget, and the complexity of the repair. If you’re unsure, it’s often safer and more cost-effective in the long run to consult with a professional.
DIY Repairs: What You Should Know
Precautions Before Starting a Repair
Before attempting any DIY laptop repair, it’s crucial to take certain precautions to ensure both your safety and the integrity of your device. Power off your laptop and unplug it from any power source to prevent any electrical hazards. Grounding yourself is also essential to avoid static damage to sensitive components.
Use the right tools for the job, such as non-magnetic screwdrivers and ESD-safe tweezers.
Keep track of screws and parts by organizing them as you disassemble your laptop.
Be gentle and avoid applying excessive force when disconnecting cables or removing parts.
Remember, if you’re not confident in your ability to perform the repair, or if your laptop is still under warranty, seeking professional help is the best course of action. Attempting repairs on your own can lead to further damage or may void your warranty.
Simple Fixes You Can Do at Home
For many laptop users, the idea of opening up their device can seem daunting. However, there are several simple fixes you can perform at home that don’t require extensive technical knowledge. Replacing a battery that no longer holds a charge or addressing a noisy fan often involves little more than a screwdriver and some patience.
While professional services are always an option, taking the DIY route for minor issues can save both time and money. It’s also an excellent opportunity to become more familiar with the inner workings of your laptop.
Here are some common DIY repairs you can attempt:
Expanding your laptop’s memory
Installing a new hard drive
Cleaning out dust from the cooling fan
Replacing a worn-out keyboard
Remember, if you’re not confident in your ability to perform these tasks, it’s best to consult with a professional. DIY repairs can be rewarding, but they also carry the risk of further damage if not done correctly.
Understanding the Risks of DIY Repairs
While DIY laptop repairs can be a cost-effective and educational experience, they come with inherent risks. Lack of experience with opening up electronics can lead to accidental damage to components. Without the proper tools and knowledge, what seems like a simple fix could result in further issues, turning a quick repair into a lengthy project. Attempting to diagnose and repair issues on your own often requires a significant investment of time. You’ll need to research the problem, order parts, and possibly wait for their delivery. Even with resources at hand, the actual repair can take longer if you’re learning as you go.
It’s important to weigh the potential savings against the risk of causing additional damage that could lead to more costly repairs or even the need for a replacement.
Before embarking on a DIY repair, consider the following points:
The complexity of the issue and your comfort level with the repair
Availability of the correct tools and replacement parts
Understanding the warranty implications of opening your device
The value of your time versus the cost of professional repair services
Professional Repair Services: When and Why
Assessing the Complexity of the Problem
When faced with a laptop screen issue, it’s crucial to assess the complexity of the problem before deciding on a repair strategy. A systematic approach to troubleshooting can help determine whether the issue is a simple fix or requires professional intervention.
Start by checking for the most common symptoms, such as flickering or dimming screens.
Consider the age and technological relevance of your laptop; older models may not support the latest features or software updates.
Evaluate the potential risks of DIY repairs, especially for complex issues like motherboard malfunctions or broken LCDs, which could lead to further damage or voided warranties.
In many cases, a keen eye for symptoms and a basic understanding of laptop anatomy will enable effective troubleshooting. However, when the problem extends beyond simple fixes, seeking professional laptop repair services is advisable to avoid exacerbating the issue.
The Benefits of Expert Repair Services
Opting for expert repair services offers significant advantages, particularly when dealing with complex laptop issues. Experienced technicians bring a wealth of knowledge to the table, ensuring that your device is diagnosed accurately and repaired efficiently. They are equipped with specialized tools and have access to quality replacement parts, which can be crucial for a successful repair. Professional services often come with the added benefit of a warranty on the work performed, providing a sense of security and trust in the service provided. This is especially important when the problem is deeply rooted in the laptop’s motherboard or requires advanced troubleshooting skills that go beyond the average user’s capabilities.
Expert diagnosis and repair
Access to specialized tools and parts
Warranty on repairs
While DIY approaches can be tempting, they carry the risk of further damage due to inexperience or improper handling. Professional repair services mitigate these risks and often result in a quicker and more reliable fix.
Warranty Considerations and Professional Help
When facing laptop issues that are beyond basic troubleshooting, it’s crucial to consider the benefits of professional repair services. These services not only offer expertise in resolving complex problems but also provide a warranty that adds a layer of protection to your investment. Before opting for professional help, it’s important to review your laptop’s warranty status. If your device is still under warranty, repairs may be covered by the manufacturer, potentially saving you significant costs. However, unauthorized repairs can void your warranty, so it’s advisable to check the terms and conditions or consult with the service provider.
Professional help ensures that complex issues are resolved without causing further damage, and often comes with a warranty on the repairs.
Here are some key points to remember when considering professional repair services:
Professional expertise is essential for motherboard issues or advanced troubleshooting.
A warranty on repairs provides additional security and peace of mind.
Assess whether the issue is covered under the manufacturer’s warranty before seeking repairs.
Unauthorized repairs can void your warranty, so always consult with the service provider first.
Safeguarding Your Data During Repairs
Backing Up Important Files
Before sending your laptop for repairs, it’s crucial to safeguard your personal data. Back up your files to an external drive or cloud storage to ensure you don’t lose important documents, photos, and other digital content. A good rule of thumb is to select a backup drive with a capacity that’s at least double the size of your laptop’s internal drive.
It’s also wise to consider removing any sensitive data from your device or performing a factory reset as an additional security measure. After your laptop is returned, secure your backup by storing it in a safe location and reset your passwords to maintain your privacy.
Regular backups are not just a one-time task; they should be part of your routine digital hygiene. Here’s a simple checklist to help you stay on top of your backup game:
Invest in a reliable backup drive or cloud service.
Verify your backups periodically to ensure data integrity.
Keep multiple backups in different locations for added security.
Data Privacy and Repair Shops
When sending your laptop for repairs, protecting your personal data is crucial. It’s advisable to back up your files to an external drive or cloud storage. For added security, consider removing sensitive data or performing a factory reset before the repair. After your laptop is returned, secure your backup and update your passwords as a precaution.
Back up files to external drive or cloud
Remove sensitive data or factory reset
Secure backup and update passwords post-repair
Ensuring your personal data is safe requires proactive steps both before and after the repair process. Take the time to secure your data to avoid potential breaches.
Remember, the only secure solution to safeguard your hard drive is to encrypt your hard drive or the sensitive data you store on it. Whole-disk encryption can be an effective method to prevent unauthorized access to your information.
Restoring Your Data Post-Repair
Once your laptop has been repaired and is back in your hands, the next critical step is to restore your data. Ensure that all your files are intact and functioning as expected after the repair process. Begin by transferring data from your backup storage to your laptop. This could be from an external hard drive, cloud storage, or any other backup solution you used prior to the repair. If you had performed a factory reset or removed sensitive data before the repair, now is the time to reinstall any necessary software and adjust your settings back to your preference. It’s also advisable to update your passwords as an added security measure.
Remember, successful data restoration is not just about getting your files back, but also about verifying the integrity and accessibility of those files.
In case you encounter issues or find that some data is missing, you may need to explore additional recovery options. These could include using specialized software or consulting with a professional if the problem is beyond your capabilities. The table below outlines some common methods for data recovery:
Method
Description
Method 1
Retrieve files from a laptop that won’t boot
Method 2
Transfer data to a new PC
Method 3
Use laptop hard disk as an external drive
After completing these steps, your laptop should be ready for use with all your personal and professional data restored.
Troubleshooting Common LCD and Monitor Issues
Resolving Flickering Screen Problems
Flickering screens can be a distracting and often concerning issue for laptop users. The problem may manifest as a rapid change in brightness or an intermittent twitch that disrupts your viewing experience. One common cause of screen flickering is an incorrect screen refresh rate. It’s essential to ensure that your laptop’s display settings are configured to the correct frequency, typically 60 Hz, though some newer screens may support higher rates. To address flickering issues, follow these steps:
Check and adjust the screen refresh rate.
Update or uninstall problematic programs that may interfere with display performance.
Inspect for physical damage or loose connections that might be causing instability.
Remember, while some fixes can be simple, such as adjusting settings or updating software, persistent screen flickering may indicate a more serious hardware issue.
If the problem persists after trying these solutions, it may be time to consult with a professional. They can diagnose whether the flickering is due to a faulty display, graphics card, or another component that might require repair or replacement.
Dealing with Dead Pixels and Lines
Dead pixels on a laptop screen are a common nuisance, manifesting as dots that remain black or a single color, failing to display images correctly. If your screen has a few dead pixels, it might not be a significant issue, but a large number can affect your viewing experience. To check for dead pixels, you can use diagnostic software that cycles through various colors, making the dead pixels more noticeable. Lines on the screen, often stemming from graphics card issues or internal damage, can be more disruptive. A single line might be ignorable, but multiple lines or color bleeding can make the screen difficult to use. In such cases, professional repair is usually the best course of action.
While some may attempt to fix dead pixels by applying pressure or using pixel-fixing software, these methods are not guaranteed and can potentially cause further damage to the screen.
Addressing Cracks and Physical Damage
An image of a MacBook with a cracked screen, displaying shattered glass fragments and jagged lines across the screen surface. Cracks and physical damage to a laptop screen are typically the result of user mishandling, such as drops or impacts during transportation. The only viable solution for a cracked screen is often a full replacement.
Symptoms: Visible cracks, loose parts, unresponsiveness due to liquid spill.
Diagnosis: Inspect for physical signs and consult with a repair expert if necessary.
While third-party local repair shops may offer cost-effective solutions for physical damage, it’s crucial to ensure they provide a warranty on their repairs for added security.
Professional repair services are recommended when dealing with severe physical damage, as they possess the expertise to handle complex issues without causing further harm. Remember, DIY repairs should only be attempted if you are comfortable with the process and have the appropriate tools.
Steps for Diagnosing Laptop Hardware Issues
Checking for Overheating and Ventilation
Overheating is a prevalent issue that can lead to crashes or unexpected shutdowns. Ensure proper ventilation by verifying that the cooling fan is operational and that air vents are not obstructed. Regular maintenance, such as cleaning out dust, is crucial for preventing overheating.
Symptoms of overheating include the device feeling excessively hot and crashing during intensive tasks.
To diagnose, listen for the fan operation, clean the air vents, and consider the use of a cooling pad if necessary.
Over time, thermal paste can dry out, diminishing its ability to transfer heat from the CPU to the heatsink. Reapplying thermal paste may be a beneficial step if overheating is a frequent problem.
If the issue persists, proceed to the next troubleshooting step. Execute hardware diagnostics via MyASUS or a similar tool provided by your laptop’s manufacturer to check for any abnormalities. This can help identify if the problem is related to hardware that may require professional attention.
Running Diagnostic Tests
Running diagnostic tests is a critical step in identifying hardware issues with your laptop. Most manufacturers provide built-in diagnostic tools that can be accessed during startup or from within the operating system. These tools can perform checks on the CPU, RAM, hard drive, and other components to pinpoint problems.
To run these diagnostics, restart your laptop and look for a prompt during the boot process that indicates how to enter the diagnostic mode. This is often achieved by pressing a specific function key like F2 or F12.
Here’s a simple list of steps to follow when running diagnostic tests:
Restart your laptop and enter the diagnostic mode as indicated.
Select the type of test you want to run (e.g., quick test, full system scan).
Wait for the test to complete and review the results.
If issues are detected, consult the manufacturer’s guidelines for further instructions or consider professional repair.
Remember, while diagnostic tests can reveal hardware problems, they may not detect all issues, especially those related to software or intermittent hardware faults. If your laptop passes all diagnostics but still behaves erratically, further investigation into software or less common hardware issues may be necessary.
Identifying Signs of Hardware Failure
Recognizing the early signs of hardware failure in your laptop can save you from unexpected crashes and data loss. Distorted or blank images on your screen may indicate a problem with the display hardware, often stemming from issues such as faulty cables, malware, or internal defects. It’s crucial to address these symptoms promptly to prevent further damage. Physical damage, such as cracks or loose components, can also signal hardware failure. If your laptop has suffered a drop or spill, inspect it for visible damage. For internal components like the motherboard and CPU, be on the lookout for signs like the laptop not powering on or experiencing frequent crashes, which could suggest severe issues. When diagnosing hardware problems, consider the following checklist:
Check for overheating by cleaning air vents or listening for a malfunctioning cooling fan.
Run manufacturer-provided diagnostic tests to identify specific hardware faults.
Inspect for physical damage, including cracks or signs of liquid damage.
Look for system errors such as blue screen errors or system halts that may indicate motherboard or CPU concerns.
Remember, while some hardware issues can be resolved with simple fixes, others may require professional expertise. Don’t hesitate to consult with a repair expert if you’re unsure about the severity of the problem.
Software Repairs and Updates
Updating Drivers and Operating Systems
Keeping your laptop’s operating system and drivers up-to-date is essential for ensuring optimal performance and security. Regularly check for and install updates to patch security vulnerabilities and improve functionality. Here’s a simple guide to maintaining your system’s software:
Check for updates: Access your operating system’s update tool and install any available updates.
Driver updates: Visit your device manufacturer’s website or use a driver management tool to find the latest drivers for your hardware.
Application updates: Keep your applications current by downloading updates from the software provider or through the app store.
Before undertaking major updates, it’s crucial to backup your data to prevent potential data loss.
Remember, an outdated system can lead to connectivity issues and software glitches. Symptoms like the inability to connect to Wi-Fi or Bluetooth devices, and intermittent software freezes, may indicate the need for an update. Diagnosis involves updating drivers, checking network settings, and if necessary, reinstalling software.
Troubleshooting Software Glitches
Software glitches can range from minor annoyances to major issues that impede your laptop’s functionality. Identifying and resolving these glitches is crucial for maintaining optimal performance. Here are some steps to troubleshoot common software problems:
Restart your laptop: This can often clear temporary glitches and should be your first step.
Update software: Keeping your operating system and applications up-to-date can resolve known bugs.
Run system scans: Built-in antivirus and anti-malware tools can help detect and remove threats that may cause software issues.
Reinstall software: If a specific program is causing trouble, reinstalling it may fix the problem.
If you encounter persistent software glitches, it may be a sign of a deeper issue. In such cases, backing up your data and performing a factory reset can be an effective last resort.
Remember, while some software issues can be fixed with these steps, others may be symptomatic of underlying hardware problems. If your laptop is failing to start or restarting repeatedly, it could be due to software conflicts, BIOS issues, or hardware problems. In these instances, it’s advisable to seek professional help, especially if you’re uncomfortable with advanced troubleshooting techniques.
Restoring Factory Settings
Restoring your laptop to its factory settings can be a crucial step in troubleshooting persistent software issues or preparing your device for repair. Before initiating a factory reset, ensure all important data is backed up to an external drive or cloud storage. This process will erase all data on your laptop, returning it to the state it was in when you first purchased it.
Performing a factory reset is often a last resort after other troubleshooting methods have failed. It can resolve problems that seem to be rooted in the system’s software by removing any corrupted files and settings.
After the reset, you will need to reinstall any previously installed programs and restore your files from the backup. Here’s a simple checklist to follow before and after a factory reset:
Back up all personal data
Note down any custom settings or preferences
Disconnect all peripheral devices
Perform the factory reset
Reinstall necessary software
Restore personal data from backup
Remember, a factory reset should not be confused with a simple restart or a hardware repair. It is a comprehensive measure that addresses multiple software issues simultaneously.
Repair and Replacement Decisions
When to Repair vs. When to Replace
Deciding whether to repair or replace your laptop is a pivotal choice that can impact both your wallet and your productivity. Minor issues like a problematic battery or a sticky key can often be resolved with simple DIY fixes or low-cost professional repairs. However, more severe problems may warrant a complete replacement, especially if the cost of repair approaches or exceeds the value of the laptop itself.
Repair if the issue is minor, the cost is reasonable, and the laptop is relatively new.
Replace if the laptop is old, the repair is costly, and newer models offer significant improvements.
Consider the age of your laptop and how the current issue affects its performance. If the laptop is less than three years old and the problem is not extensive, repair is usually the most cost-effective option. On the other hand, if the laptop is older and struggling to keep up with modern software, investing in a new device might be more prudent.
Ultimately, the decision to repair or replace hinges on a balance between the laptop’s age, the severity of the issue, and the potential benefits of new technology. Reflect on how you use your laptop and the personal value you place on the latest features before making your choice.
Cost-Benefit Analysis of Laptop Repairs
When faced with a malfunctioning laptop, the decision to repair or replace can be challenging. Assessing the cost-effectiveness of repairs versus purchasing a new laptop is crucial. A repair might be worthwhile if it restores your laptop’s performance and reliability without exceeding a reasonable portion of the laptop’s value. Consider the age of your laptop and the potential benefits of new technology. A new laptop may offer advanced features and a warranty, but it’s important to evaluate if these align with your needs. If the repair cost is significant, especially for older models, investing in a new device might be more practical.
The rule of thumb is that if the repair cost exceeds half the value of your laptop, it may be time to consider a replacement.
Here’s a quick reference to help you decide:
Age of Laptop: Older laptops might not be worth the repair cost.
Repair Cost: If it’s more than half the laptop’s value, think twice.
Performance Needs: Does the laptop meet your current requirements?
New Technology: Weigh the benefits of new features and warranty against the cost.
Finding Compatible Replacement Parts
When it comes to laptop repairs, finding the right replacement parts is crucial. Compatibility and performance are key factors when selecting components like screens, keyboards, or batteries. It’s important to source genuine parts to ensure the best fit and functionality for your device. For instance, if you’re looking for a laptop screen replacement, prices can start as low as $34.99, but it’s essential to match the screen to your laptop’s make and model. Before purchasing replacement parts, consider the following steps:
Verify the exact part number needed for your laptop model.
Research reputable suppliers who specialize in laptop parts.
Compare prices and warranty offers from different vendors.
Check for customer reviews to gauge the reliability of the parts.
Remember, while the initial cost of a part might seem attractive, the true value comes from its compatibility and how it extends the life of your laptop.
Professional repair services can also be a valuable resource when you’re unsure about the right parts or if the repair seems too complex. They can provide expert advice and often offer a warranty on their work, giving you peace of mind.
Conclusion
Navigating the maze of laptop screen problems can be daunting, but with the insights provided in this article, you’re now equipped to identify and address many common issues. From dead pixels to cracked screens, understanding the symptoms and possible fixes can save you both time and money. Remember to consider the complexity of the problem and your own technical expertise before attempting DIY repairs. For intricate issues or when in doubt, seeking professional help is the prudent choice to avoid further damage and ensure your laptop’s longevity. Always back up your data before any repair and invest in protective gear to safeguard your device from future mishaps. With the right approach, you can keep your laptop screen in top condition and maintain an uninterrupted workflow.
Frequently Asked Questions
When should I consider professional repair services over fixing a laptop screen by myself?
Complex problems like motherboard issues or a broken LCD should typically be handled by a professional. Trying to fix these on your own without the right tools or expertise can result in more damage or void warranties.
How do I safeguard my personal data when sending my laptop for repairs?
Before sending your laptop for repairs, ensure you back up all important files to an external drive or cloud storage. Additionally, consider removing sensitive data or using encryption to protect your information.
What are the common steps for diagnosing laptop hardware issues?
When hardware problems surface, start by checking for overheating and cleaning air vents. Listen for a malfunctioning cooling fan and run a diagnostic test if available to identify hardware faults.
How can I perform a software repair on my laptop?
To perform a software repair, start by updating your drivers and operating system. Troubleshoot software glitches by checking for updates or patches. If necessary, restore factory settings to resolve persistent issues.
What precautions should I take before attempting a DIY laptop screen repair?
Before attempting a DIY repair, power off your laptop and disconnect it from any power source. Ground yourself to prevent static damage to internal components. If under warranty or you’re not confident, seek professional help.
How do I replace my laptop keyboard?
To replace your laptop keyboard, you’ll need to purchase a compatible replacement. Begin by shutting down your laptop and removing the battery. Unscrew the back panel, disconnect the old keyboard, and carefully install the new one.
What should I do if I see dead pixels on my laptop screen?
If you notice dead pixels, try running a pixel fixer software which can sometimes stimulate them back to life. If the issue persists, the screen may need to be professionally repaired or replaced.
When to repair vs. when to replace my laptop or laptop screen?
Consider repairing your laptop if the cost is significantly lower than replacement and the issue is fixable. Replace your laptop if it’s outdated, repairs are too costly, or you need more advanced features and performance.
Got a laptop on the fritz? Don’t despair – your neighborhood repair solution is right here! Volta PC Upgrade & Repair is your local, friendly source for affordable and expert laptop repair service in Singapore. Whether it’s a cracked screen, a dying battery, or something more mysterious, we’re ready to help. Get in touch for a quick quote and let’s get your laptop back in action!
Laptops, indispensable tools for work and play, are prone to a variety of screen problems that can disrupt your day-to-day activities. From flickering displays to