Motherboard Repair Machinery

10 Essential Steps to Assess Motherboard’s Health and Performance

Assessing your motherboard’s health and performance is crucial for maintaining the stability and efficiency of your computer system. By following these 10 essential steps, you can ensure that your motherboard is in optimal condition and functioning at its best capacity. From visual inspections to diagnostic tools, each step plays a vital role in evaluating the health of your motherboard and identifying potential issues.

Key Takeaways

  • Regular visual inspections can help identify physical damage on the motherboard.
  • Checking BIOS/UEFI for system information is essential for understanding the motherboard’s configuration.
  • Using diagnostic tools can provide detailed insights into the motherboard’s performance and health status.
  • Monitoring temperature and voltage levels is crucial for preventing overheating and hardware damage.
  • Beep codes analysis during startup can indicate potential hardware issues that need attention.

1. Visual Inspection

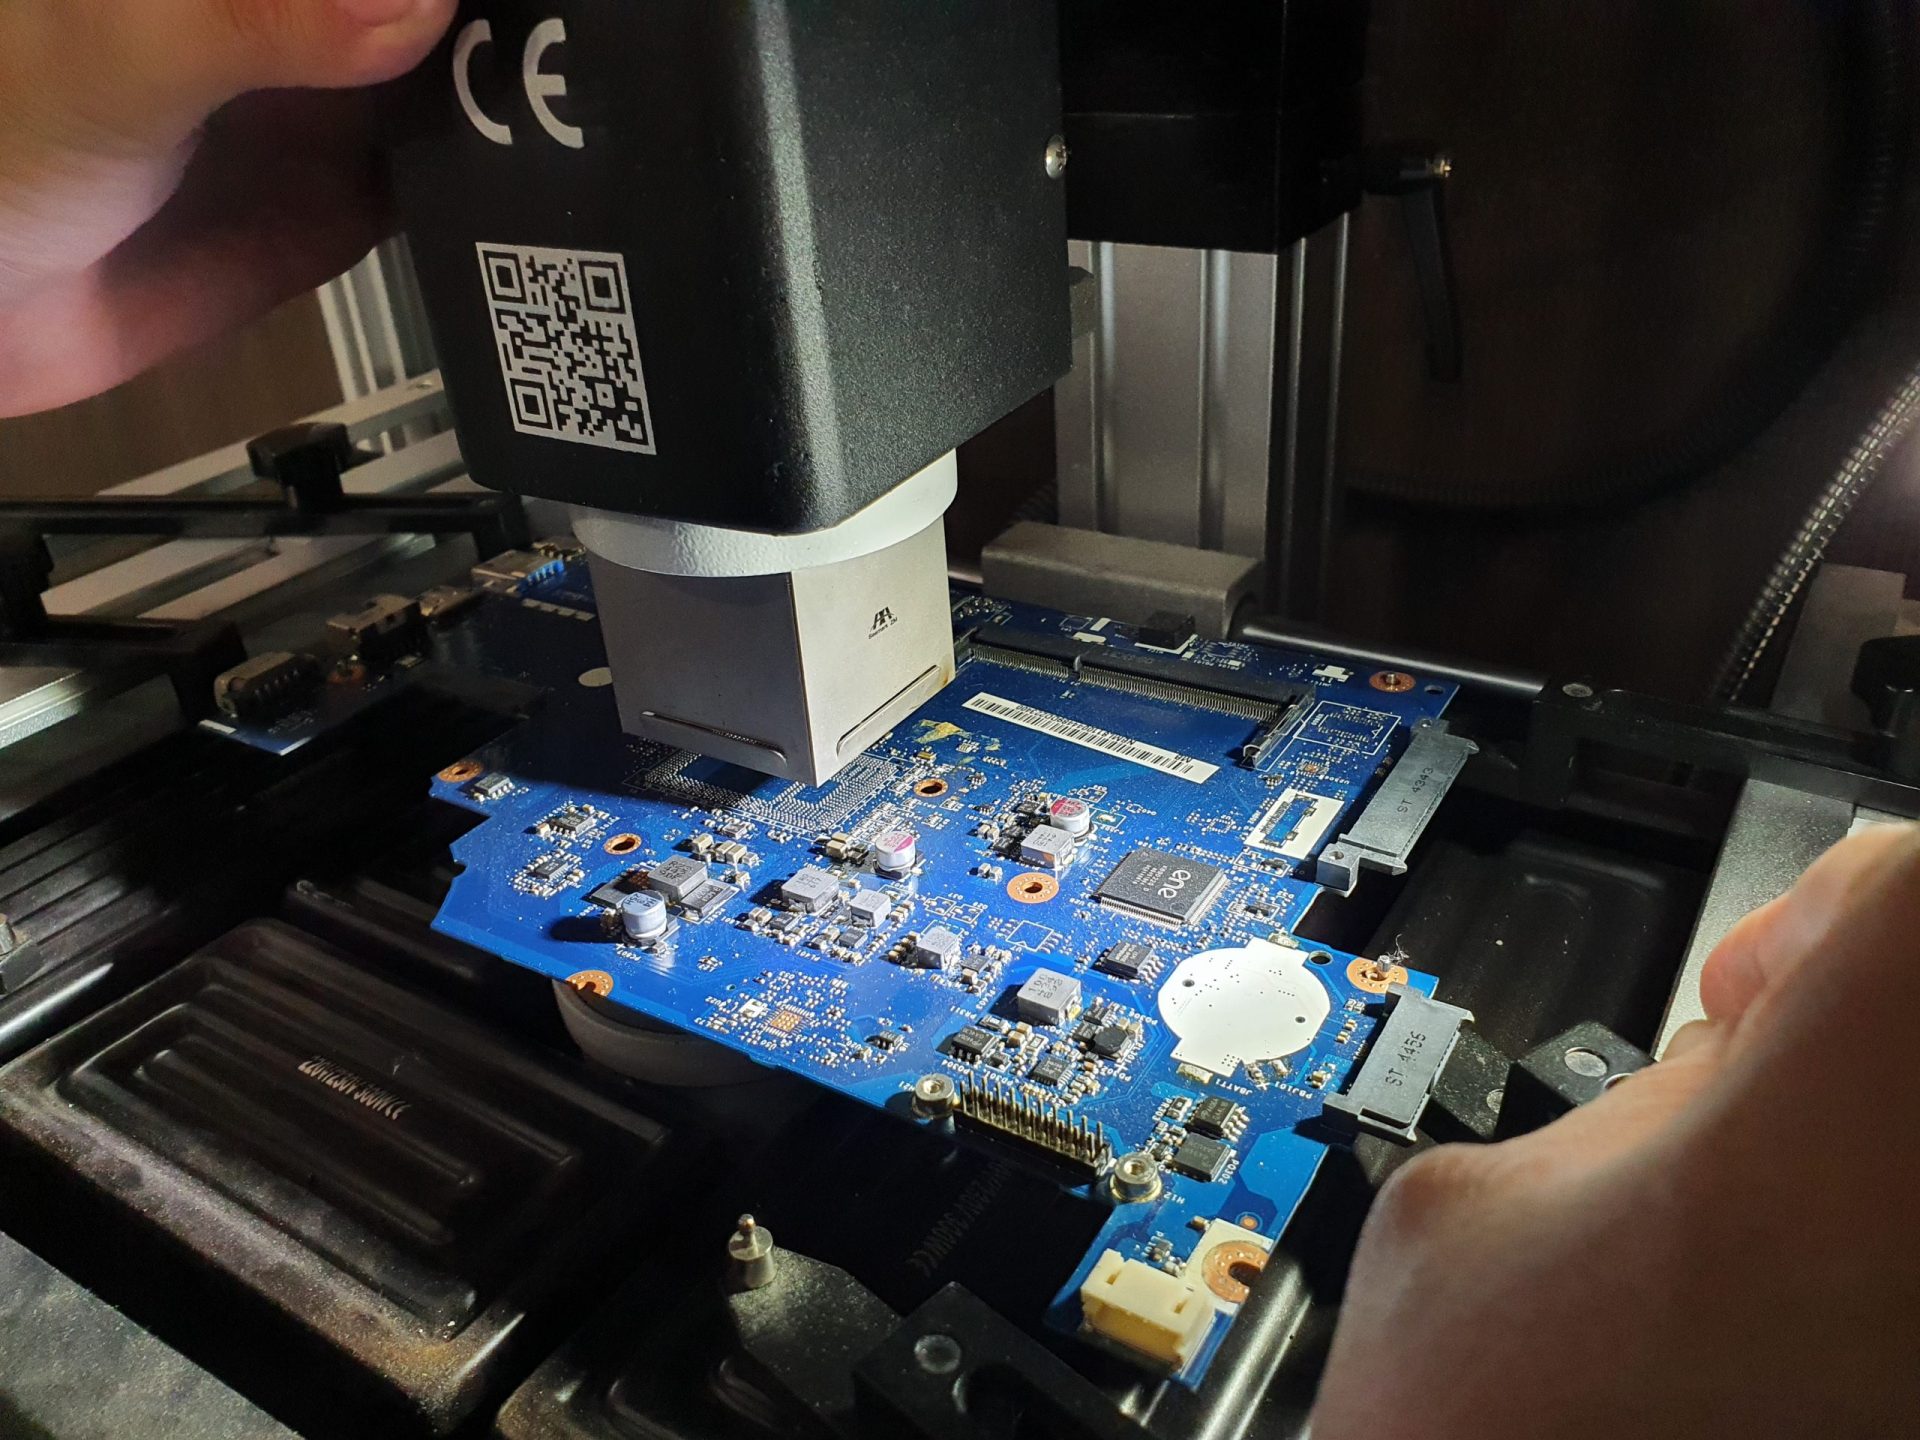
Professional Motherboard Repair Equipment at VOLTA PC Upgrade & Repair

The first step in assessing your motherboard’s health is a thorough visual inspection. This process involves examining the motherboard for any signs of physical damage, such as burnt components, bulging capacitors, or broken connectors. It’s crucial to look for any discoloration or unusual markings that could indicate overheating or electrical issues.
Pay particular attention to the areas around the CPU, power supply connectors, and memory slots, as these are common hotspots for problems.
Additionally, check for dust accumulation and debris, which can cause overheating and impede proper airflow. Ensure that all cables are securely connected and that there are no loose parts. If you encounter any of the following issues, it may be a warning sign of a bad motherboard:
  • Failure to POST
  • Blue Screen of Death (BSoD)
  • Unexplained Shutdowns
  • GPU Artifacts
  • Crashing Due to Overclocking
  • USB Peripherals Not Working
Addressing these issues early can prevent further damage and save on costly repairs or replacements.

2. BIOS/UEFI Check

The BIOS/UEFI is the motherboard’s backbone, controlling the most fundamental operations of your computer. A thorough check of the BIOS/UEFI settings can reveal issues related to power management, device boot priority, and overall system stability.
To start, reboot your PC and access the BIOS/UEFI setup by pressing the designated key shown during startup. This is often Del, F2, F10, or Esc. Once inside, navigate through the menus to review settings and ensure they align with your system’s requirements.
Here are some common settings to examine:
  • Boot sequence and device priority
  • Power management options
  • Integrated peripherals configuration
  • System clock and voltage settings
After updating, verify the new BIOS version and check for any system stability or performance issues. It’s crucial to keep the BIOS up to date, as manufacturers release updates to fix bugs, improve compatibility, and enhance performance. Remember to reboot your system after any changes to apply them effectively.

3. Diagnostic Tools

When assessing the health and performance of your motherboard, utilizing diagnostic tools is crucial. These tools can range from simple software applications to more complex hardware devices designed to pinpoint issues. For instance, a multimeter can be used to verify the integrity of circuits and the quality of electricity in computer components, while a loopback adapter tests the functionality of computer ports.
Proper use of diagnostic tools not only helps in identifying problems but also in preventing potential damage during troubleshooting.
Here’s a list of some common diagnostic tools and their uses:
  • Multimeter: Tests circuit integrity and electricity quality.
  • Loopback Adapter: Checks computer port functionality.
Remember, the right diagnostic tool can make the difference between a quick fix and a lengthy troubleshooting session. For more detailed guidance, consider exploring resources like ‘Best Hardware Diagnostic Tool: 10 User-Friendly Options’ to find the best hardware diagnostic tool for your needs.

4. Temperature Monitoring

Monitoring the temperature of your motherboard and its components is crucial for maintaining optimal performance and longevity. High temperatures can lead to hardware failure, so it’s important to keep an eye on thermal readings. Most motherboards come with built-in sensors that can be accessed through the BIOS/UEFI or third-party software. To effectively monitor temperatures, consider the following steps:
  • Identify the normal operating temperature range for your CPU, GPU, and other critical components.
  • Use a reliable temperature monitoring application to track real-time temperatures.
  • Set up alerts to notify you if temperatures exceed safe thresholds.
Remember, consistent temperature monitoring can preemptively alert you to potential issues before they escalate into serious problems.
It’s also beneficial to understand the heat flow within your system and ensure that cooling solutions, such as fans or heat sinks, are properly sized and functioning. This knowledge can be applied to predict the performance of components like a single-phase induction motor and to analyze various control methods used on induction motors.

5. Beep Codes Analysis

Understanding beep codes is crucial when assessing your motherboard’s health. These codes are emitted by the motherboard’s BIOS during the POST (Power-On Self-Test) to indicate hardware issues. Different motherboard manufacturers have different beep codes for all kinds of faults, making it essential to refer to the manufacturer’s documentation for interpretation. For a quick reference, here’s a common beep code pattern list:
  • 1 short beep: System normal
  • 2 short beeps: POST error
  • 1 long beep and 1 short beep: Motherboard problem
  • Continuous long beeps: Power supply unit failure
Pay close attention to the sequence and length of beeps after powering on the system. This initial diagnostic can save time by directing you towards the specific problem area.
Remember, not all motherboards have a speaker to produce beep codes. If your system doesn’t emit any beeps, ensure that a speaker is present and properly connected. If beeps are still absent, it could indicate a more severe issue with the motherboard or its components.

6. Firmware Update

Keeping your motherboard’s firmware up-to-date is crucial for ensuring compatibility with the latest hardware and software. Firmware updates can also resolve potential security vulnerabilities and improve overall system stability. Before proceeding with an update, it’s important to verify the current firmware version and check the manufacturer’s website for any available updates. To update your motherboard’s firmware, follow these general steps:
  1. Visit the manufacturer’s website and navigate to the support or downloads section.
  2. Locate the firmware update file for your specific motherboard model.
  3. Download the update and carefully read the instructions provided by the manufacturer.
  4. Prepare a USB drive and copy the firmware update file to it.
  5. Reboot your system and enter the BIOS/UEFI setup.
  6. Use the built-in firmware update utility to select and install the update from the USB drive.
It is essential to follow the manufacturer’s instructions precisely during the update process to avoid any potential issues that could harm your motherboard.
After the update, it’s advisable to perform a system reboot and re-enter the BIOS/UEFI to confirm the new firmware version. Additionally, ensure that all drivers are updated to maintain optimal performance and compatibility.

7. RAM Slot Testing

Testing your motherboard’s RAM slots is a critical step in assessing its health. Ensure that each slot is functioning properly by using a known good memory module and testing each slot individually. If your motherboard supports dual-channel memory, refer to the user manual to identify the correct pairs of RAM sockets to use. To test the slots, follow these steps:
  1. Power off your computer and open the case.
  2. Remove existing RAM modules, if necessary.
  3. Insert a single, working RAM module into the first slot.
  4. Power on your computer and check for successful boot or any error messages.
  5. Repeat the process for each slot, using the same RAM module.
It’s important to test each slot with the same memory module to rule out the possibility of a defective RAM module causing false slot failure indications.
Remember, RAM is volatile and holds data only when the power is on. When the power is off, RAM’s contents are lost. This characteristic is crucial when handling and testing RAM modules to avoid data loss.

8. PCI Slot Inspection

Inspecting the PCI slots on your motherboard is crucial for ensuring that expansion cards are properly seated and functioning. Perform a visual check to confirm there are no physical damages or obstructions in the slots that could affect connectivity.
  • Begin by powering off your computer and removing the case cover.
  • Examine each PCI slot for signs of damage, dust, or debris.
  • Ensure that any installed cards are firmly seated in their respective slots.
  • Check for loose or missing screws that secure the cards to the case.
It’s important to handle the motherboard and components with care to avoid static discharge or physical damage.
If you encounter issues with expansion cards, consider cleaning the PCI slots with compressed air and reseating the cards. If problems persist, testing the cards in another system can help determine if the issue lies with the slot or the card itself.

9. System Logs Review

Reviewing system logs is a critical step in assessing your motherboard’s health and performance. System logs provide insights into the operational history of your system, revealing errors and events that may indicate hardware issues. To effectively analyze system logs, follow these steps:
  • Identify the log files relevant to motherboard performance, such as BIOS event logs or system error logs.
  • Look for patterns or recurring errors that could signal a problem with the motherboard.
  • Pay attention to timestamps to correlate issues with specific hardware changes or system updates.
It’s important to approach system logs with a methodical mindset, as they can contain a wealth of information that is not immediately apparent.
Remember, some issues may not cause immediate failures but can lead to instability over time. Therefore, regular review of system logs is recommended to preempt potential problems. Utilize available system information tools to simplify the process of log analysis.

10. Diagnostic Software

The final step in assessing your motherboard’s health and performance is to utilize diagnostic software. These tools provide a comprehensive analysis of your system’s hardware, often pinpointing issues that are not immediately apparent through other methods. Diagnostic software ranges from built-in operating system utilities to advanced third-party applications. For instance, Windows 10 includes a tool called PC Hardware Check, which can be accessed by typing ‘memory’ in the search box and selecting the Windows Memory Diagnostic program. This utility can perform a thorough check of your RAM, an essential component connected to the motherboard. Here are some of the most popular diagnostic tools:
  • Multimeter: Tests circuit integrity and electricity quality in components.
  • Loopback Adapter: Checks computer port functionality.
It’s crucial to regularly use diagnostic software to ensure that your motherboard and connected components are functioning optimally. This proactive approach can help prevent future system failures and maintain performance levels.

Conclusion

In conclusion, assessing the health and performance of your motherboard is crucial for maintaining the stability and efficiency of your computer system. By following the 10 essential steps outlined in this article, including visual inspection, checking BIOS/UEFI, using diagnostic tools, monitoring temperature and voltage, updating firmware, testing RAM slots, inspecting PCI slots, reviewing system logs, and utilizing third-party software, you can ensure that your motherboard is in optimal condition. Remember, the motherboard is the backbone of your PC, so taking care of it is essential for overall system functionality and longevity.

Frequently Asked Questions

How do I check my motherboard’s condition?

– Visual inspection for physical damage – Check BIOS/UEFI for system info – Use built-in diagnostic tools – Monitor temperature and voltage – Listen for beep codes on startup – Update motherboard firmware – Test RAM slots – Inspect PCI slots and connectors – Review system logs – Use third-party diagnostic software – Seek professional diagnosis

What are the essential steps for preparing the motherboard before installation?

– Remove the motherboard screws – Lift the motherboard out of the frame – Inspect for visible defects – Review the motherboard manual for layout – Install the processor, heat sink, and memory modules

Why is it important to update motherboard firmware?

Updating motherboard firmware ensures compatibility with new components and fixes potential security vulnerabilities. It also improves system stability and performance.

How can I protect my components from static electricity during motherboard installation?

– Wear an antistatic strap – Place the motherboard on top of the antistatic bag – Inspect for visible defects before securing the motherboard – Review the motherboard manual for socket identification

What is the significance of testing RAM slots during motherboard assessment?

Testing RAM slots helps ensure proper memory functionality and identifies any faulty slots that may affect system performance. It is essential for diagnosing memory-related issues.

Where can I find resources for learning about computer hardware assembly and servicing?

Utilize online video presentations and tutorials on connecting PC parts, read books on computer hardware servicing, and visit websites with detailed guides on installing computer components.

mainboard repair

If you’re facing issues with your motherboard and are unsure about the best course of action, don’t let it sideline your productivity or gaming. Volta PC Upgrade & Repair is your go-to solution in Singapore for motherboard repair service. With a team of skilled technicians who specialize in diagnosing and fixing motherboard issues, you can trust us to breathe new life into your PC. Whether it’s a simple repair or a complex upgrade, we’re equipped to handle it. Don’t wait for small issues to turn into big problems. Contact Volta PC Upgrade & Repair today and maximize your motherboard’s health.

Contact Volta PC Upgrade & Repair Today!

  • Address:
    • Tai Seng Branch: 8 Burn Road #01-04, Trivex, Singapore 369977
    • Jurong Branch: Blk 132 #01-279C, Jurong Gateway Road, Singapore 6001324
  • ContactWhatsapp us | Call 69500453 | Telegram us
X