How to Tackle and Prevent CPU Bent Pins: Ultimate Computer Repair

Dealing with bent CPU pins can be a frustrating experience for computer enthusiasts and professionals alike. In this article, we will explore various methods to tackle and prevent CPU bent pins, ranging from DIY fixes to professional solutions. By understanding the causes of bent pins and implementing preventive measures, you can safeguard your CPU from potential damage and ensure optimal performance. Let’s delve into the key takeaways from each section:

Key Takeaways

  • Proper handling techniques are crucial in preventing CPU bent pins.
  • Regular inspections can help you identify bent pins early on and prevent further damage.
  • DIY solutions like using a mechanical pencil or credit card can be effective in straightening bent pins.
  • Professional repair services, such as microsoldering and pin replacement, offer reliable solutions for severe cases of bent pins.
  • Implementing proper storage practices and upgrading CPU coolers can help prevent future CPU pin issues.

Understanding CPU Pins

Socket Types

The type of CPU socket on a motherboard determines the compatibility with various processors. Different sockets support different pin configurations, which directly affects the CPU’s capabilities and performance. For instance, Intel and AMD, the two major CPU manufacturers, have their own unique socket designs.
  • Intel CPU sockets have evolved over time, with each new type supporting advancements in technology. Some of the common Intel sockets include:
    • LGA 1151 for mainstream desktop CPUs
    • LGA 2066 for high-end desktop platforms
    • LGA 1200 for the latest 10th and 11th Gen processors
  • AMD also has a range of sockets, such as:
    • AM4 for its Ryzen series of CPUs
    • TR4 for the Ryzen Threadripper series
    • sTRX4 for the latest Threadripper CPUs
It’s crucial to ensure that the CPU and motherboard socket types match to avoid any issues with installation or performance. Incorrectly aligning or forcing a CPU into a non-compatible socket can lead to bent pins or other damage.

Pin Configuration

The configuration of CPU pins is critical to the proper functioning of a computer’s processor. Each pin on a CPU has a specific role, whether it’s for power delivery, data transmission, or grounding. Understanding the layout and arrangement of these pins is essential for both troubleshooting and repair.
  • LGA (Land Grid Array): Pins are on the socket, not the CPU.
  • PGA (Pin Grid Array): Pins are on the CPU, making them more vulnerable to bending.
  • BGA (Ball Grid Array): Soldered to the motherboard, not user-serviceable.
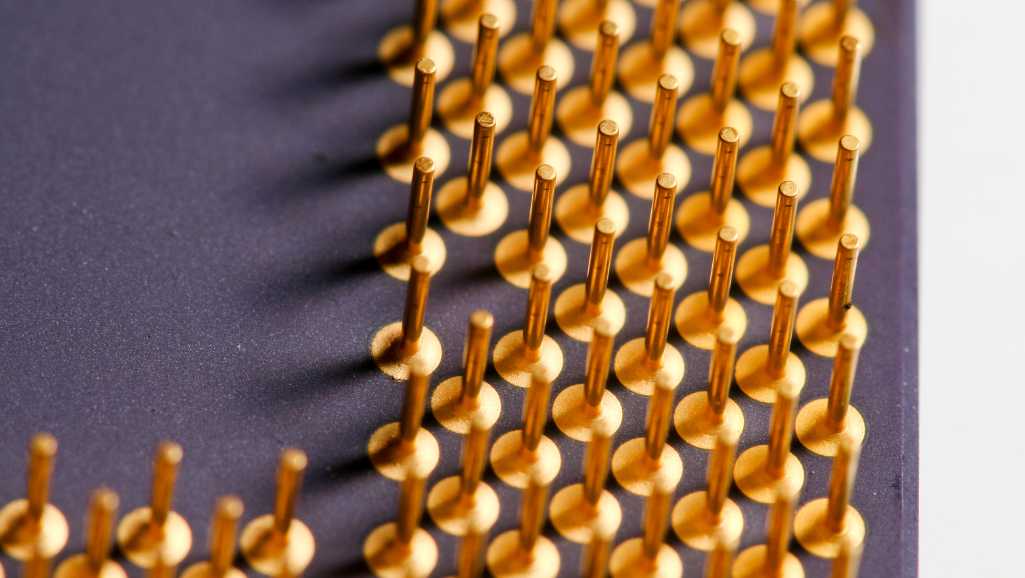
The precise alignment of pins ensures that the CPU can communicate effectively with other components. Even a single bent pin can disrupt this communication, leading to system instability or failure.
When attempting to repair bent pins, it’s important to have a steady hand and the right tools. As noted in an article by PCGamesN, repairing wonky pins on a processor requires a scalpel and a bit of patience. This highlights the delicate nature of the task and the importance of precision.

Function of CPU Pins

The CPU pins are critical for the operation of your computer as they facilitate the connection between the CPU and the motherboard, allowing for communication and power transfer. Each pin has a specific role, whether it’s for power, grounding, data transmission, or control signals.
  • Power pins supply the CPU with the necessary voltage.
  • Ground pins are essential for completing the electrical circuit.
  • Data pins are responsible for transferring instructions and information.
  • Control pins manage the coordination of data flow and power.
Ensuring that each pin is intact and properly aligned is crucial for the CPU to function correctly. Bent or broken pins can disrupt this delicate ecosystem, leading to hardware failure or suboptimal performance.

Identifying Bent Pins

Visual Inspection

Source: NXT level PC

The first step in addressing bent CPU pins is a thorough visual inspection. This process involves examining the pins to assess the extent of the damage. It’s crucial to have good lighting and a steady hand. Begin by gently tilting the CPU at various angles to catch the light, which can help reveal any pins that are out of alignment.
  • Look for any pins that deviate from the uniform grid pattern.
  • Note the severity and number of bent pins.
  • Determine if the bending is localized or widespread across the CPU surface.
Visual inspection is not just about identifying bent pins, but also understanding the pattern and severity of the issue to plan the best course of action.
After the initial assessment, you may decide to proceed with a DIY fix or seek professional help. Remember, patience and precision are key when dealing with delicate CPU pins.

Testing Connectivity

After visually inspecting the CPU for bent pins, testing the connectivity is a crucial step to confirm the extent of the damage. This can be done using a multimeter to check for continuity between the CPU pins and their corresponding contacts on the motherboard socket.
  • Turn off the computer and disconnect all power sources.
  • Remove the CPU carefully from the socket.
  • Set the multimeter to the continuity setting.
  • Place one probe on the CPU pin and the other on the corresponding contact point.
  • A continuous beep indicates a good connection; no sound suggests a bent or broken pin.
It’s important to handle the CPU and multimeter probes with care to avoid further damage or static discharge. Conduct this test in a static-free environment and use anti-static wrist straps if available.
If you encounter pins with no connectivity, note their location. This information will be valuable when deciding whether to attempt a DIY fix or seek professional repair services.

Using Magnification Tools

When inspecting for bent CPU pins, magnification tools can be invaluable. These tools allow for a closer and more detailed examination, revealing issues that might be invisible to the naked eye. A common magnification tool is a jeweler’s loupe, which provides a high level of magnification in a portable format. For more intricate work, a microscope or a magnifying lamp can be used. These devices often come with additional lighting, which helps to illuminate the pins and make any bends more apparent. It’s important to handle the CPU gently while using these tools to avoid causing further damage.
  • Jeweler’s Loupe: Portable and provides significant magnification.
  • Microscope: Offers high magnification and detail visibility.
  • Magnifying Lamp: Combines illumination with magnification for clearer view.
Careful magnification can reveal subtle bends that might otherwise go unnoticed, ensuring that all pins are thoroughly inspected before proceeding with any repair attempts.

DIY Solutions for Straightening Bent Pins

Using a Mechanical Pencil

One of the most accessible and effective methods for straightening bent CPU pins is the mechanical pencil technique. This method is particularly useful for pins that are not severely bent and can be gently nudged back into place.
  • Step 1: Find a mechanical pencil with a diameter that snugly fits the pin. Remove any lead from the pencil.
  • Step 2: Carefully insert the hollow tip over the bent pin.
  • Step 3: Gently rotate the pencil or move it up and down to straighten the pin.
  • Step 4: Check the alignment with adjacent pins to ensure it is straight.
This technique requires a steady hand and patience. It’s important not to apply too much force, as this can break the pin or cause further bending. The goal is to realign the pin with minimal pressure.
Remember, while this method is effective for minor bends, it may not be suitable for pins that are severely damaged or broken. In such cases, professional repair services may be necessary.

Credit Card Method

Source: wikiHow

The Credit Card Method is a popular DIY approach for straightening bent CPU pins. This technique involves using the edge of a credit card to realign the pins gently. The card’s straight edge acts as a guide, allowing for precise adjustments without applying excessive force.
  • Begin by identifying the bent pins.
  • Position the credit card’s edge perpendicular to the rows of pins.
  • Gently apply pressure to the bent pin(s) by pushing the card in their direction, straightening them in the process.
  • Move slowly and cautiously, taking care to not bend other pins.
It’s crucial to ensure that the card is clean and free of debris to avoid damaging the CPU surface. A steady hand and patience are key to successfully using this method.
Remember, while this method can be effective for minor bends, it’s not suitable for severely damaged pins or a large number of affected pins. In such cases, professional repair services may be necessary.

Needle and Tweezers Technique

The Needle and Tweezers Technique is a precise method for straightening bent CPU pins. This approach requires a steady hand and patience, as it involves gently manipulating each bent pin back into its correct position using a needle to guide and tweezers to adjust the pin.
  • Begin by grounding yourself to prevent static discharge.
  • Use a needle to carefully align the pin with the correct angle.
  • With tweezers, gently grasp the pin and straighten it.
  • Repeat the process for each bent pin, checking alignment frequently.
This technique is particularly useful for pins that are severely bent or in hard-to-reach places. It allows for fine control and minimal risk of further bending or breaking the pins.
Remember, while this method can be effective, it is not suitable for all situations. For example, it does not work well for cleaning header pins, and care must be taken to ensure that the mounting bracket isn’t bent, which could cause additional issues.

Professional Computer Repair Services

Microsoldering Services

When CPU pins are bent beyond a simple DIY fix, microsoldering services offer a professional solution. Specialists in this field use precision tools and techniques to repair delicate components without causing further damage.
  • Assessment: A thorough examination to determine the extent of pin damage.
  • Repair: Utilizing microsoldering tools to carefully straighten or replace bent pins.
  • Quality Check: Ensuring the CPU functions correctly post-repair.
Microsoldering is a highly skilled task that should only be performed by trained professionals to avoid the risk of permanent CPU damage.
Choosing a reputable service provider is crucial, as they will have the necessary expertise and equipment to restore your CPU to its optimal condition. Always inquire about warranties or guarantees on the repair work to ensure the longevity of your CPU’s functionality.

Pin Replacement

In cases where bent pins cannot be straightened or are damaged beyond repair, pin replacement is a viable option. This delicate process involves removing the damaged pin and soldering a new one in its place. It requires precision and expertise, as improper handling can lead to further damage to the CPU or the motherboard.
  • Identify the damaged pin(s) and prepare the replacement pin(s).
  • Carefully desolder the damaged pin using a soldering iron and solder wick.
  • Clean the area to ensure no residual solder remains.
  • Solder the new pin in place, ensuring it aligns perfectly with the existing grid.
  • Inspect the repair to confirm the new pin is secure and correctly positioned.
The success of pin replacement largely depends on the skill of the technician and the quality of the replacement pins. It’s crucial to use pins that match the original specifications to maintain the integrity of the CPU’s functionality.

Diagnostic Testing

After straightening the bent pins, it’s crucial to verify that the CPU is functioning correctly. Diagnostic testing is a comprehensive process that professionals use to ensure both the CPU and motherboard are communicating effectively. This step is essential, as physical repair is only part of the solution; the CPU must also perform as expected when reinstalled.
  • Visual inspection of the CPU and socket
  • Electrical continuity tests
  • Performance benchmarking
  • Stress testing under load
Ensuring that the CPU passes these tests is indicative of a successful repair. It’s not just about the physical integrity of the pins but also about the overall health of the CPU.
Professionals may use a variety of tools and software to conduct these tests, which can range from basic POST (Power-On Self-Test) checks to more advanced diagnostic software that can detect even the most subtle issues. If any problems are identified, further repairs or adjustments may be necessary before the CPU can be deemed fully operational.

Reinstalling the CPU After Repair

Socket Alignment

After addressing bent pins and ensuring they are straightened, the next critical step is socket alignment. This process is vital to prevent any further damage to the CPU or the motherboard. Begin by carefully positioning the CPU above the socket, aligning it according to the notches or markings that indicate the correct orientation.
  • Ensure the CPU is level before lowering it into the socket.
  • Gently place the CPU without applying force; it should fit snugly if aligned correctly.
  • Avoid touching the pins or the contact points on the underside of the CPU.
Proper socket alignment is not just about placing the CPU correctly; it’s about safeguarding the integrity of the computer’s most crucial component.
Once the CPU is seated in the socket, check for any signs of misalignment or resistance. If the CPU does not settle properly, lift it out carefully and re-examine the pins and the socket for any obstructions or debris that might be causing the issue.

Thermal Paste Application

Here we see a hand holding a syringe filled with thermal paste, poised to apply the substance to a central chip on a laptop's motherboard. This represents the step where new thermal paste is applied to ensure efficient heat transfer from the CPU.

hand holding a syringe filled with thermal paste, poised to apply the substance to a central chip on a laptop’s motherboard.

Applying thermal paste is a critical step in ensuring efficient heat transfer from the CPU to the heatsink. A small, pea-sized amount of paste should be placed in the center of the CPU. This method allows the heatsink’s pressure to spread the paste evenly across the surface when mounted.
  • Clean the CPU surface with isopropyl alcohol and a lint-free cloth.
  • Apply the thermal paste to the center of the CPU.
  • Carefully place the heatsink on top, ensuring even pressure.
It’s important not to over-apply thermal paste as excess can lead to poor thermal performance and potentially damage components if it spills over.

Testing for Functionality

After straightening bent pins or having your CPU professionally repaired, testing for functionality is crucial to ensure that the repair was successful. Begin by carefully reinstalling the CPU into the motherboard socket, ensuring proper alignment and secure attachment.
  • Power on the system and enter the BIOS to check if the CPU is recognized correctly.
  • Run a stress test using software like Prime95 or IntelBurnTest to evaluate the CPU’s stability under load.
  • Monitor the temperatures using a hardware monitoring tool to ensure they stay within safe limits.
It’s important to observe the system’s behavior during these tests. Any instability or failure to boot could indicate that further repair is needed.
If the CPU passes all tests, you can proceed with confidence that your repair has restored its functionality. However, if issues persist, consider seeking further professional assistance or exploring warranty options.

Preventing Future Issues

Proper Storage Practices

Ensuring the longevity and reliability of your CPU involves adopting proper storage practices when the processor is not in use. Avoid touching the CPU pins as they are delicate and can be easily bent. Always handle the CPU by its edges and place it in a protective container or a CPU socket cover when not installed in a motherboard.
  • Store the CPU in a dry, cool place away from static electricity.
  • Use anti-static bags or containers specifically designed for electronic components.
  • Keep the CPU away from magnetic fields which can disrupt or damage the internal architecture.
When storing your CPU, consider the environment. Extreme temperatures and humidity can cause condensation and corrosion, which are detrimental to the CPU’s pins and overall functionality. Remember, proper storage is a preventative measure that can save you from the hassle of dealing with bent pins or other damage.

Avoiding Rough Handling

To maintain the integrity of your CPU’s delicate pins, avoiding rough handling is crucial. CPUs are sensitive components that can be easily damaged by excessive force or careless actions. When installing or removing a CPU, apply gentle pressure and ensure that your movements are controlled and precise.
  • Always hold the CPU by its edges to minimize the risk of bending pins.
  • Avoid touching the pins directly; oils from your skin can cause corrosion over time.
  • Use the correct tools for CPU installation and removal to prevent accidental damage.
By respecting the fragility of CPU pins and handling them with care, you can significantly reduce the likelihood of bending and the need for repairs.
Remember that using specialized tools like the CPU Stress Bending Correction Bracket can provide additional protection during handling. This aluminum alloy contact tool is designed to fix bent pins effectively without causing injury or further damage to the CPU.

Upgrading CPU Coolers

One effective way to prevent CPU pins from bending due to excessive force or heat is by upgrading your CPU cooler. A high-quality cooler can significantly reduce the thermal stress on the CPU and its socket, which in turn minimizes the risk of physical damage during handling or operation. When selecting a new CPU cooler, consider the following factors:
  • Compatibility with your CPU socket type
  • Thermal performance ratings
  • Noise level
  • Size and clearance within your case
  • Aesthetics and lighting (if important to you)
Upgrading to a more efficient cooler not only enhances the performance of your CPU but also contributes to the longevity of your system’s components.
For those interested in the latest and best options, PC Gamer’s “Best CPU coolers in 2024” list is a great starting point. Here are a few top picks:
  • Corsair iCUE H170i Elite Capellix XT
  • Deepcool Gammaxx L240 V2
  • Deepcool AS500 Plus
  • Be Quiet!
Remember, a cooler upgrade is a long-term investment in your system’s health and performance.

Conclusion

In conclusion, dealing with CPU bent pins can be a frustrating experience for PC enthusiasts and professionals alike. However, by understanding the causes, prevention methods, and repair options outlined in this article, individuals can effectively tackle and prevent CPU bent pins. Whether opting for DIY fixes or seeking professional assistance, the key is to handle the situation with care and patience. Remember, prevention is always better than cure, so taking proactive steps to safeguard your CPU pins is essential for maintaining the longevity and performance of your computer system. By following the tips and guidelines provided, you can ensure that your CPU remains in optimal condition and avoid the headaches associated with bent pins in the future.

Frequently Asked Questions on CPU bent pins

What causes CPU pins to bend?

CPU pins can bend due to mishandling during installation, removal, or cleaning processes.

Can bent CPU pins be fixed?

Yes, bent CPU pins can often be straightened using DIY methods or professional repair services.

How can I prevent CPU pins from bending?

Proper handling techniques, using a CPU cover, and regular inspections can help prevent CPU pins from bending.

Is it safe to straighten bent CPU pins myself?

It is possible to straighten bent CPU pins yourself, but caution and precision are required to avoid further damage.

What tools can I use to identify bent CPU pins?

Visual inspection, testing connectivity, and magnification tools like magnifying glasses or microscopes can help identify bent CPU pins.

Are there any risks involved in straightening bent CPU pins?

There is a risk of causing further damage to the CPU or pins if the straightening process is not done carefully.

How long does it take to repair bent CPU pins professionally?

The time taken to repair bent CPU pins professionally can vary depending on the extent of the damage and the repair method used.

Can bent CPU pins affect the performance of the CPU?

Yes, bent CPU pins can affect the performance of the CPU by disrupting the connection between the CPU and the motherboard.

Where to Fix Bent CPU Pin in Singapore

In Singapore, addressing the delicate issue of a bent CPU pin requires a service provider with expertise and precision. Volta PC Upgrade & Repair is a highly recommended option for desktop repairs. Furthermore, they specialize in handling complex hardware issues, including the precise task of straightening bent CPU pins. Why Choose Volta PC Upgrade & Repair?
  • Expertise: Technicians at Volta possess the necessary skills and tools to carefully repair bent CPU pins, ensuring your processor is restored to its optimal condition.
  • Quality Service: Known for their attention to detail and commitment to customer satisfaction, Volta ensures your CPU receives the best care.
  • Convenience: Located conveniently in Singapore, Volta PC Upgrade & Repair offers a straightforward process for diagnosing and fixing your CPU issues.
Hence, for anyone facing the challenge of a bent CPU pin, Volta PC Upgrade & Repair provides a reliable, professional solution to get your system running smoothly again.

Contact Volta PC Upgrade & Repair Today!

  • Address:
    • Tai Seng Branch: 8 Burn Road #01-04, Trivex, Singapore 369977
    • Jurong Branch: Blk 132 #01-279C, Jurong Gateway Road, Singapore 6001324
  • ContactWhatsapp us | Call 69500453 | Telegram us
X