Can Super Glue Really Save Your Laptop Hinge

Welcome to the dynamic world of laptop maintenance, specifically focusing on the critical aspect of laptop hinge repair. The hinge, a seemingly small component, plays a pivotal role in the functionality and longevity of your laptop. However, it’s not uncommon for these hinges to succumb to wear and tear, leading to a range of issues from loose connections to complete breaks. This is where the concept of fixing a laptop hinge becomes crucial. In this guide, we delve deep into the nuances of laptop hinge repair. We’re not just scratching the surface; we’re exploring every angle to provide you with comprehensive knowledge. Whether it’s a minor issue or a significant breakdown, understanding the intricacies of your laptop’s hinge system is paramount. We’ll guide you through various methods, from the traditional tightening of screws to the more unconventional use of super glue. Each technique is presented with clear, easy-to-understand instructions, ensuring you can make an informed decision on the best course of action for your specific situation.

Key points to be covered:

  1. Hinge Issues & Solutions
    • Common hinge problems: looseness, breakage.
    • Solutions range from tightening screws to using adhesives.
  2. Can Super Glue Really Save Your Laptop Hinge?
    • Super glue is a quick fix for minor hinge issues.
    • Effective for small cracks in plastic parts.
    • Not suitable for severe damage or metal repairs.
    • Caution: Precise application is crucial to avoid further damage.
  3. Repair Techniques
    • Methods vary tightening, gluing, replacing.
    • Use super glue for minor cracks, epoxy for serious damage.
  4. Practical Tips
    • Tighten screws for loose hinges.
    • Use adhesives carefully for cracked plastic.
    • Replace hinges if severely damaged.
  5. Preventive Care
    • Handle laptops gently.
    • Regular maintenance is crucial.
    • Avoid overextending the hinge.

Understanding Laptop Hinge Damage

When it comes to laptop hinge repair, a solid understanding of the types of damage is crucial. This knowledge not only aids in accurately diagnosing the issue but also in determining the most effective method to fix the laptop hinge. Hinge problems, often underestimated, can significantly impact your laptop’s usability and longevity.

Firstly, let’s talk about loose hinges.

This issue, commonly encountered, manifests as a screen that wobbles or doesn’t stay put. It usually signals that the hinge screws need tightening, a relatively simple fix in the realm of laptop hinge repair. However, regular use and the age of the device can wear out these screws, making the problem more frequent.

Moving on to broken hinges – a more severe problem.

This type of damage is unmistakable. You might notice visible cracks or breaks in the hinge assembly, and in extreme cases, the screen may not stay upright at all. Such damage demands a more comprehensive approach to fix the laptop hinge, often involving replacement parts.

Lastly, stuck hinges present a unique challenge.

They restrict the laptop’s lid movement, making it difficult to open or close. This issue usually stems from a lack of lubrication or debris buildup. Addressing it involves cleaning and possibly lubricating the hinge mechanism. Each type of damage requires a tailored approach to repair. While super glue can offer a quick fix, particularly for minor cracks or breaks, understanding the extent of the damage is key. A superficial fix might provide a temporary solution, but it may not address underlying issues that could lead to further damage. Therefore, before diving into laptop hinge repair, take a moment to assess the situation. A quick inspection can save you time and ensure that your repair method aligns with the specific needs of your laptop. Remember, the goal is not just to fix the laptop hinge but to restore the device’s functionality and reliability for the long haul.

Can Super Glue Fix Laptop Hinges?

When delving into the realm of laptop hinge repair, one commonly proposed solution is using super glue. The question arises: can super glue effectively fix laptop hinges?

The answer is both yes and no, depending on the specific circumstances of the hinge damage.

Super glue, known for its strong bonding capabilities, can be a quick fix for certain types of hinge damage.
It’s particularly useful for minor cracks or breaks in the plastic parts of the hinge. The application process is straightforward: clean the broken parts, apply the glue precisely, and hold the pieces together until the glue sets. This method is quite appealing for its simplicity and immediate results.
However, this approach comes with limitations.
Firstly, super glue may not hold up under the mechanical stress that laptop hinges typically endure. Hinges experience constant movement and pressure, and over time, the glue bond might weaken, leading to recurring problems. Additionally, super glue is less effective for more severe hinge damage, such as completely broken metal parts or severely loosened hinges that require a mechanical fix. Another critical factor to consider is the precision required in the application of super glue. An excess or improperly applied adhesive can lead to further issues, such as restricting the hinge’s movement or causing it to stick. Therefore, while super glue can be a temporary solution, it is not always the most reliable or long-lasting method for laptop hinge repair.
laptop bottom cracked hinge broken dell

The photo shows a laptop hinge that has suffered severe damage: the plastic housing around the hinge is visibly cracked and parts of the internal mechanism are exposed. Such extensive damage goes beyond what could be remedied with a simple application of super glue.

In conclusion, while super glue can offer a quick fix for minor hinge issues, it is not a one-size-fits-all solution. For more complex or severe hinge problems, exploring other repair methods or seeking professional help may be more effective. Remember, the goal of fixing a laptop hinge is not just to reattach broken parts but to restore the hinge’s full functionality and durability.

Repair Methods for Laptop Hinge

Embarking on laptop hinge repair can seem daunting, but with the right approach, it’s a manageable task. Here are some effective methods to fix laptop hinges, each suited to different types of damage.

a/ Tightening Loose Hinges

Loose hinges are a common issue but often have a straightforward fix. You’ll typically need a screwdriver for this. Start by gently opening the laptop to access the hinge screws, which are usually visible on the back of the laptop. Tighten these screws carefully, ensuring not to overtighten them as this can strip the threads. This method is ideal for hinges that have become loose over time due to regular use.

Here’s a detailed approach to effectively fix a cracked plastic housing:

  1. Assess the Damage
    • Before you start, assess the extent of the crack. Small, clean cracks are more likely to be successfully repaired than large, jagged ones. This assessment will guide you in choosing the right adhesive and method.
  2. Gather Your Materials
    • For this repair, you will need high-quality super glue or a specialized plastic adhesive. Additionally, gather fine sandpaper, a small brush or toothpick for application, and cleaning alcohol or a similar solvent.
  3. Prepare the Area
    • Turn off your laptop and disconnect it from any power sources. Clean the cracked area with alcohol to remove any dirt or grease. This step ensures the glue adheres properly to the surface.
  4. Apply the Adhesive
    • Apply a small amount of glue on one side of the cracked area using the brush or toothpick. Be precise and controlled in your application to avoid excess glue that can seep into the laptop’s internals or hinder the hinge’s movement.
  5. Clamp the Crack
    • After applying the adhesive, press the cracked sides together and hold firmly. You can use a clamp or tape to keep the parts tightly joined while the glue dries. Follow the glue manufacturer’s recommended drying time for the best results.
  6. Finishing Touches
    • Once the glue is completely dry, gently sand the repaired area to smooth any rough edges. Be careful not to apply too much pressure, which could reopen the crack.
  7. Testing and Caution
    • After the repair, gently open and close the laptop to test the hinge’s movement. The repair should hold, but be aware that this fix may not withstand the same stress as the original material. Treat the repaired area with extra care to avoid future breaks.
  8. Seek Professional Help if Needed
    • If the crack is too large or if you’re not confident in your ability to repair it, seek professional help. Sometimes, a replacement of the part might be more effective than a repair.

b/ Repairing Cracked Plastic Housing

For hinges with a cracked plastic housing, super glue can be a temporary solution. After powering down and safely opening your laptop, locate the cracked area around the hinge. Clean the area thoroughly, then apply super glue with precision to avoid excess spillage. Hold the parts firmly until the glue sets. This fix is best for minor cracks and should not be considered a permanent solution for severe damage.

Here’s how to efficiently fix laptop hinges by replacing the metal components:

  1. Identify the Correct Replacement Hinges
    • First, determine the exact model of your laptop. Using this information, purchase the appropriate replacement hinges. You can find these either through your laptop’s manufacturer or from reputable online retailers. Ensure the hinges are specific to your model for a perfect fit.
  2. Gather Necessary Tools
    • Prepare a workspace with a small screwdriver set, including Phillips and flat-head types, and possibly a pry tool. Keep a container handy to hold screws and small parts.
  3. Disassemble the Laptop
    • Power off your laptop and disconnect all power sources. Remove the battery if possible. Start by carefully removing the screws from the laptop’s bottom. Keep track of each screw and where it belongs, as they might differ in size.
  4. Access and Remove the Broken Hinges
    • Gently pry open the laptop casing or bezel to access the hinges. This step may vary depending on your laptop model. Once you’ve exposed the hinges, carefully unscrew and remove them. Pay attention to how they’re fitted, as you’ll need to replicate this with the new hinges.
  5. Install the New Hinges
    • Position the new hinges exactly where the old ones were located. Screw them in place, ensuring they’re tight but not overly so to prevent damaging the screw threads or the laptop’s casing.
  6. Reassemble the Laptop
    • Carefully reassemble your laptop by reversing the disassembly steps. Ensure all components are correctly aligned and screws are returned to their original places.
  7. Test the Repair
    • Once reassembled, gently open and close the laptop to test the new hinges. They should allow smooth movement without any wobble or stiffness.
  8. Consider Professional Assistance
    • If you’re unsure about any step in this process or uncomfortable with disassembling your laptop, it might be best to consult a professional. Improper installation can lead to further damage.
 

c/ Replacing Metal Hinges

Close-up image of a Lenovo laptop hinge, requires professional laptop repair

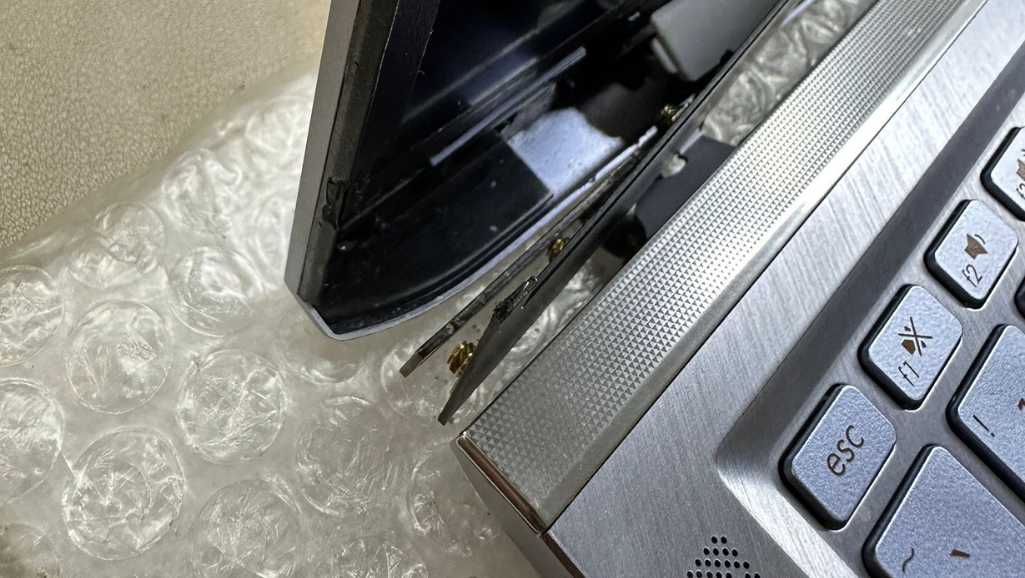
The image presented appears to showcase a laptop’s metal hinge, which is partially exposed next to the keyboard area. The visible hinge suggests it has experienced some degree of wear or damage, typically indicated by its exposure and potential misalignment.

In cases where the metal part of the hinge is broken, replacement is often necessary. Begin by purchasing the correct replacement hinges for your laptop model. You will need to disassemble the part of your laptop that houses the hinges, which usually involves removing several screws and carefully detaching the screen from the base. Replace the broken hinge with the new one, ensuring everything aligns correctly, and then reassemble your laptop. This method requires a bit more technical skill and patience but is a reliable solution for serious hinge damage.

Here’s how to efficiently fix laptop hinges by replacing the metal components:

  1. Identify the Correct Replacement Hinges
    • First, determine the exact model of your laptop. Using this information, purchase the appropriate replacement hinges. You can find these either through your laptop’s manufacturer or from reputable online retailers. Ensure the hinges are specific to your model for a perfect fit.
  2. Gather Necessary Tools
    • Prepare a workspace with a small screwdriver set, including Phillips and flat-head types, and possibly a pry tool. Keep a container handy to hold screws and small parts.
  3. Disassemble the Laptop
    • Power off your laptop and disconnect all power sources. Remove the battery if possible. Start by carefully removing the screws from the laptop’s bottom. Keep track of each screw and where it belongs, as they might differ in size.
  4. Access and Remove the Broken Hinges
    • Gently pry open the laptop casing or bezel to access the hinges. This step may vary depending on your laptop model. Once you’ve exposed the hinges, carefully unscrew and remove them. Pay attention to how they’re fitted, as you’ll need to replicate this with the new hinges.
  5. Install the New Hinges
    • Position the new hinges exactly where the old ones were located. Screw them in place, ensuring they’re tight but not overly so to prevent damaging the screw threads or the laptop’s casing. Close-up image of a Lenovo laptop hinge, requires professional laptop repair
  6. Reassemble the Laptop
    • Carefully reassemble your laptop by reversing the disassembly steps. Ensure all components are correctly aligned and screws are returned to their original places.
  7. Test the Repair
    • Once reassembled, gently open and close the laptop to test the new hinges. They should allow smooth movement without any wobble or stiffness.
  8. Consider Professional Assistance
    • If you’re unsure about any step in this process or uncomfortable with disassembling your laptop, it might be best to consult a professional. Improper installation can lead to further damage.

d/ Using Epoxy or Industrial-Strength Adhesives

For a stronger bond than super glue, especially in cases of significant breakage, epoxy or industrial-strength adhesives can be effective. Prepare the broken hinge area by cleaning it thoroughly. Apply the adhesive according to the manufacturer’s instructions, usually mixing two components before application. Hold or clamp the pieces until the adhesive sets completely, which can take several hours. This method is more robust than super glue but still may not withstand long-term wear and tear like a mechanical fix would.

Here’s a detailed guide on how to use these adhesives to fix laptop hinges:

  1. Select the Right Adhesive
    • Epoxy and industrial-strength adhesives are known for their strong bonding capabilities. Choose a product designed for metal and plastic, ensuring compatibility with your laptop’s materials. Epoxy that comes in two parts (resin and hardener) is often recommended for its durable bond.
  2. Prepare Your Workspace
    • Ensure a well-ventilated and clean workspace. Lay down protective sheets to prevent any spills or drips on surfaces.
  3. Prepare the Hinge and Laptop
    • Power down and unplug your laptop. Remove the battery if possible. Clean the hinge area with alcohol or a similar solvent to remove grease or dirt. This step is crucial for the adhesive to bond effectively.
  4. Mix the Epoxy
    • If you’re using a two-part epoxy, mix the resin and hardener as per the manufacturer’s instructions. Ensure the mixture is even for optimal strength.
  5. Apply the Adhesive
    • Apply the epoxy to the broken parts of the hinge using a small tool like a toothpick or a disposable brush for precision. Be cautious not to apply too much, as excess adhesive can seep out and hinder the hinge’s movement or damage other parts of the laptop.
  6. Clamp and Cure
    • After applying the adhesive, align the broken parts and hold them together. Use a clamp or tape for a secure bond. Allow the adhesive to cure for the time specified by the manufacturer, which can vary from a few hours to overnight.
  7. Reassemble and Test
    • Once the adhesive is fully cured and the hinge is firmly bonded, reassemble any parts of the laptop that were disassembled. Test the hinge’s functionality by gently opening and closing the laptop, ensuring the repair holds and the movement is smooth.
  8. Seek Professional Help if Needed
    • If you’re not confident in your ability to perform this repair or if the damage seems too complex, it’s advisable to consult a professional. Incorrect application of epoxy can cause further damage.
In all these methods, the key is to work carefully and methodically. Ensure your workspace is clean and organized, and keep track of all screws and parts. If you’re not confident in your ability to safely disassemble and reassemble your laptop, seeking professional help is advisable. The right fix can extend the life of your laptop significantly, making the effort well worth it. Remember, each laptop model may have specific instructions for hinge repair, so consulting your laptop’s manual or manufacturer’s website can provide additional guidance.
Note: While we provide guidance on steps you can take to address laptop hinge issues, it is crucial to emphasize the importance of professional repair. Laptop hinges are complex mechanisms that, when damaged, can lead to more serious issues, including screen damage. An improperly repaired hinge can cause stress on the screen and the internal cables, leading to costly damages. We strongly recommend seeking professional services for a proper repair or replacement of your laptop hinge. Professionals have the necessary tools, parts, and expertise to ensure that the repair is done safely and effectively, which not only saves you from potential additional damage but also ensures the longevity of your laptop’s use.

Preventive Tips

Preventing damage to laptop hinges is key to avoiding the need for laptop hinge repair. By following these tips, you can maintain the integrity of your laptop’s hinges, ensuring they remain functional for the lifespan of your device.
  1. Handle with Care
    • Always open and close your laptop gently. Avoid forceful movements, as they can strain the hinges over time. This cautious handling is particularly important for laptops with heavier screens or touchscreens.
  2. Regular Maintenance
    • Keep the hinge area clean and free from dust. A build-up of dirt can lead to stiffness and eventually damage the hinges. You can use a soft brush or compressed air to gently clean around the hinge area.
  3. Use on Stable Surfaces
    • Always use your laptop on stable, flat surfaces. Uneven or soft surfaces like beds and couches can cause uneven pressure on the hinges, leading to potential damage.
  4. Avoid Excessive Force
    • Never pick up your laptop by its screen. This habit can exert unnecessary pressure on the hinges, weakening them over time.
  5. Regular Inspections
    • Periodically check the tightness of the hinge screws. If they feel loose, gently tighten them with an appropriate screwdriver. However, be careful not to overtighten, as this can strip the screws or damage the hinge.
  6. Proper Storage and Transportation
    • When transporting your laptop, use a padded case that provides support and protection. This precaution is especially important for laptops carried frequently, as jostling and bumps can loosen or damage the hinges.
  7. Avoid Overextending the Screen
    • Do not open the laptop screen beyond its designed angle. Overextending can stress the hinges and lead to damage.
By implementing these preventative measures, you can significantly reduce the likelihood of needing to fix laptop hinges. Remember, prevention is always better than repair. Regular maintenance and careful handling can extend the life of your laptop’s hinges, saving you time and the potential cost of repairs.

FAQs: Can Super Glue Really Save Your Laptop Hinge

  1. Can you glue a laptop hinge?

    • Yes: Gluing a laptop hinge is a feasible temporary solution.
    • Type of Glue: Use super glue or epoxy for minor cracks, especially in plastic components.
    • Limitations: Not effective for severe damage or metal parts.
    • Application Caution: Apply carefully to avoid hindering hinge movement or damaging laptop components.
  2. Can I use glue on my laptop?

    • Yes, With Caution: Suitable for minor repairs like fixing cracks or loose components.
    • Type of Glue: Depends on the material – plastic bonding adhesive for plastic parts, and stronger epoxy for metal.
    • Preparation: Clean and dry the area before application.
    • Warning: Avoid contact with electronic components.
  3. What is the best glue for laptop repair?

    • Plastic Parts: Plastic bonding adhesive or super glue.
    • Metal Components or Durable Bond: Two-part epoxy resin.
    • Strength: Epoxy provides a strong, durable bond.
    • Instructions: Follow the manufacturer’s guidelines for mixing and curing.

Conclusion

Navigating through the intricacies of laptop hinge repair can be a challenging yet rewarding endeavor. From tightening loose hinges to replacing damaged metal components, and from using super glue for minor cracks to applying epoxy for more severe cases, each method serves a specific need in preserving the functionality of your laptop. Remember, the essence of these repairs is not just to fix a broken part but to restore and extend the life of your device. Equally important is the role of prevention. By handling your laptop with care, performing regular maintenance, and avoiding practices that strain the hinges, you can significantly reduce the need for repairs. Such preventative measures not only save you time and resources but also ensure that your laptop remains a reliable tool for your daily needs. In conclusion, whether you’re a DIY enthusiast or prefer professional assistance, understanding the various aspects of laptop hinge repair empowers you to make informed decisions. This knowledge not only contributes to the longevity of your laptop but also enhances your skills in maintaining and caring for your electronic devices. Remember, when it comes to laptop hinges, a little attention and care can go a long way in ensuring their smooth operation and durability.

Where to Fix Laptop Hinge in Singapore

If you’re looking to fix a laptop hinge in Singapore, one highly recommended service provider is Volta PC Upgrade & Repair. Known for their expertise in laptop repairs, Volta PC Upgrade & Repair offers a range of services that cater to various laptop issues, including hinge repair.

Why Choose Volta PC Upgrade & Repair?

  • Expertise in Laptop Repairs: They specialize in handling a wide array of laptop-related problems, including the delicate task of hinge repair.
  • Quality Service: Known for their attention to detail and commitment to quality, ensuring your laptop hinge is repaired with precision.
  • Customer Satisfaction: They prioritize customer satisfaction, focusing on providing reliable and efficient repair services.
Whether your laptop hinge is loose, broken, or completely detached, Volta PC Upgrade & Repair has the skills and resources to effectively address the issue. Their technical team can assess the damage and recommend the best course of action, providing a professional repair service that aims to restore your laptop’s functionality and extend its lifespan. For more details on their services, location, and how to schedule a repair, you can visit their official website or contact them directly. This way, you can ensure that your laptop hinge repair is in capable hands.

Contact Volta PC Upgrade & Repair Today!

  • Address:
    • Tai Seng Branch: 8 Burn Road #01-04, Trivex, Singapore 369977
    • Jurong Branch: Blk 132 #01-279C, Jurong Gateway Road, Singapore 6001324
  • ContactWhatsapp us | Call 69500453 | Telegram us
  • Explore the average pricing for professional laptop hinge repairs here.

MORE ON LAPTOP HINGE REPAIR

X