Best Ways On How To Address Memory Integrity Incompatible Driver Errors: Ultimate Computer Repair Singapore
Memory Integrity Incompatible Driver Errors in Windows 11 can be a challenging endeavor. From incompatible drivers to complex settings in the Group Policy Editor, the path to enhanced system security is fraught with obstacles. This comprehensive guide aims to demystify the process, offering step-by-step methods and troubleshooting tips to help you successfully enable Memory Integrity. Whether you’re a novice user or a seasoned tech enthusiast, this guide has something for everyone.
The Role of Memory Integrity in Enhancing System Security

Photo via Microsoft Support
In the realm of computer security, Memory Integrity stands as a cornerstone. It’s a feature embedded in Windows 11 and other modern operating systems. Specifically, it falls under the umbrella of virtualization-based security. So, what makes Memory Integrity so crucial? Let’s delve into its role in fortifying system security.
A Layer of Defense
Firstly, Memory Integrity acts as an additional layer of defense. It protects your system from malware and other security threats. Essentially, it safeguards critical processes running on your computer. This is vital because these processes often have elevated permissions. If compromised, they can wreak havoc on your system.
Virtualization-Based Security
Memory Integrity is a part of virtualization-based security. This is a broader framework that isolates critical parts of the OS. It places them in a separate, secure environment. This way, even if malware infiltrates your system, it can’t tamper with these isolated areas. In essence, it’s like having a secure vault within your computer.
The Kernel Level
The real magic happens at the kernel level. Here, Memory Integrity works to prevent code injection attacks. These attacks are notorious for inserting malicious code into high-privilege processes. By doing so, they can gain control over your system. Memory Integrity stops this by ensuring that only authorized code runs at the kernel level.
In summary, Memory Integrity plays a pivotal role in enhancing system security. It acts as a robust layer of defense against malware and other threats. By being a part of virtualization-based security, it adds an extra layer of protection. It operates at the kernel level to prevent unauthorized code from running.
Memory Integrity Incompatible Driver: Common Errors and Symptoms When Enabling Memory Integrity
Navigating the world of Memory Integrity can sometimes feel like walking through a maze. Especially in Windows 11, you might encounter various roadblocks. One of the most common issues is the Incompatible Drivers Error. So, let’s delve into the common errors and symptoms you might face when dealing with Memory Integrity.
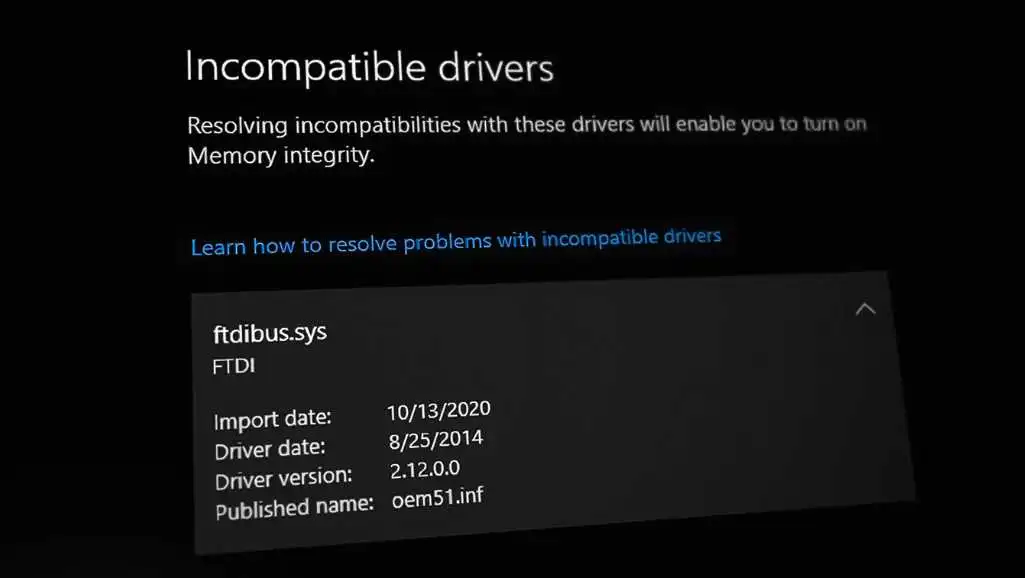
Memory Integrity Incompatible Driver Error
Photo via Appuals
Firstly, the Incompatible Drivers Error often pops up when you try to enable Memory Integrity. This error occurs because a driver on your system doesn’t meet the security standards set by Windows. Essentially, it’s a red flag. It warns you that enabling Memory Integrity could cause system instability.
Greyed-Out Toggle
Another issue you might face is a greyed-out toggle for enabling Memory Integrity. This usually happens when your system doesn’t support virtualization-based security. In such cases, you’ll need to check if your hardware supports this feature. If it does, updating your BIOS settings might resolve the issue.
Error Messages
Error messages can also appear when you try to enable Memory Integrity. These messages often contain codes that might seem like gibberish at first. However, they serve as indicators of what’s going wrong. For instance, a “Code 48” usually means that a piece of hardware is not starting because the software is incompatible.
System Crashes
In some instances, enabling Memory Integrity can lead to system crashes. These crashes manifest as the infamous “Blue Screen of Death” (BSOD). When this happens, it’s crucial to note down the error code displayed. This code can help you or a computer repair service in Singapore diagnose the issue more effectively.
Group Policy Editor Errors
For advanced users, the Group Policy Editor is a go-to tool for enabling Memory Integrity. However, errors can occur here too. You might see messages like “Policy not applicable” or “Access Denied.” These errors usually indicate that you don’t have the necessary permissions to make changes.
Virtual Machine Platform and Windows Hypervisor Platform Issues
Sometimes, the Virtual Machine Platform and Windows Hypervisor Platform can also cause issues. These features need to be enabled for Memory Integrity to work correctly. If they’re not, you might face errors like “Feature cannot be enabled” or “Virtualization not supported.”
Core Isolation Errors
Core Isolation is another feature that works in tandem with Memory Integrity. Errors here can range from “Core Isolation cannot be enabled” to “Hardware not compatible.” These errors often point to issues with your system’s hardware or firmware.
Slow System Performance
Lastly, enabling Memory Integrity can sometimes slow down your system. This is particularly true for older hardware. If you notice a significant drop in performance, it might be best to disable the feature and consult a professional.
In summary, enabling Memory Integrity in Windows 11 can come with its own set of challenges. From Memory Integrity Incompatible Driver Errors to system crashes, the road to enhanced security isn’t always smooth.
Troubleshooting Tips for Memory Integrity Incompatible Driver Issues
Even with the best guides and intentions, you might still encounter Memory Integrity Incompatible Driver issues. However, don’t lose hope. There are several troubleshooting tips that can help you resolve these problems. Let’s dive into some of these solutions.
Update Your Drivers
Firstly, outdated drivers are often the culprits behind the Incompatible Drivers Error. To resolve this, make sure all your drivers are up-to-date. You can do this by visiting the manufacturer’s website or using the Windows Update tool.
Check Virtualization Support
Another tip is to check if your hardware supports virtualization. This is crucial for enabling virtualization-based security features. You can usually find this information in your system’s BIOS settings.
Use Windows Security Center
Photo via Microsoft Support
Windows Security Center can be a helpful tool. It provides real-time protection and security insights. Navigate to Device Security > Core Isolation Details to check the status of Memory Integrity.
Disable Third-Party Security Software
Sometimes, third-party security software can interfere with Memory Integrity. If you’re facing issues, try disabling these programs temporarily. After that, attempt to enable Memory Integrity again.
Run the Troubleshooter
Windows 11 comes with built-in troubleshooters for various issues. Running the troubleshooter can sometimes resolve the problem automatically. To do this, go to Settings > Update & Security > Troubleshoot.
Check for Windows Updates
Outdated Windows versions can also cause issues. Therefore, make sure your system is up-to-date. You can check for updates by navigating to Settings > Update & Security > Windows Update.
Revisit Group Policy Editor
If you’ve used the Group Policy Editor, double-check your settings. A small mistake can lead to bigger issues. Make sure you’ve followed all the steps correctly.
Verify Virtual Machine and Windows Hypervisor Platform Settings
Similarly, if you’ve enabled the Virtual Machine Platform and Windows Hypervisor Platform, verify these settings. Incorrect configurations can cause problems with Memory Integrity.
Consult Online Forums
Online forums can be a treasure trove of information. Websites like Reddit and Microsoft Community often have threads related to Memory Integrity issues. You might find a solution that works for you.
How To Address Memory Integrity Incompatible Driver Errors
Method 1: Enabling Memory Integrity Using Group Policy Editor
If you’re using Windows 11 and want to enhance your system’s security, enabling Memory Integrity is a smart move. However, you might encounter the notorious Incompatible Drivers Error. Don’t worry; there’s a workaround. Specifically, you can use the Group Policy Editor to bypass this issue. Let’s dive into the step-by-step guide on how to accomplish this.
What is the Group Policy Editor?
Firstly, the Group Policy Editor is a built-in tool in Windows. It allows users to manage and configure operating system settings. Importantly, it’s a part of the broader virtualization-based security framework. This tool is especially useful for advanced users who want to customize their system settings.
Accessing the Group Policy Editor
To start, you’ll need to access the Group Policy Editor. Simply press the Windows + R keys together. This will open the Run dialog box. Next, type gpedit.msc and hit Enter. This command will open the Group Policy Editor window.
Navigating to the Right Section
Once inside, you’ll see two main sections: “Computer Configuration” and “User Configuration.” For this task, focus on “Computer Configuration.” Double-click to expand it. Then, navigate to Administrative Templates > System > Device Guard. Here, you’ll find the setting for enabling virtualization-based security.
Enabling Virtualization-Based Security
Now, locate the setting that says “Turn on Virtualization Based Security.” Double-click on it. A new window will appear. In this window, select the “Enabled” option. This action will enable virtualization-based security, which is essential for Memory Integrity.
Photo via Microsoft Learn
Configuring Additional Settings
After enabling virtualization-based security, you’ll see additional settings below. Here, you can specify how you want the feature to work. For instance, you can choose to enable Virtual Machine Platform or Windows Hypervisor Platform. These platforms enhance the security features of Memory Integrity.
Applying the Changes
Once you’ve made your selections, click “Apply.” Then, click “OK” to close the window. These actions will save your settings. Now, you’ve successfully enabled Memory Integrity using the Group Policy Editor.
Verifying the Changes
To ensure that the changes have taken effect, restart your computer. After rebooting, go to Windows Security settings. Navigate to Device Security > Core Isolation Details. Here, you should see that Memory Integrity is enabled.
Method 2: Enabling Virtual Machine and Windows Hypervisor Platform Features
If you’re looking to bolster your system’s security, enabling Memory Integrity is a step in the right direction. However, sometimes the direct route isn’t the easiest one. You might face obstacles like the Incompatible Drivers Error. Fortunately, there’s another way to navigate this issue. Specifically, you can enable the Virtual Machine Platform and Windows Hypervisor Platform features. Let’s delve into how to do this.
Understanding the Importance
Firstly, it’s crucial to understand why these features matter. Both the Virtual Machine Platform and Windows Hypervisor Platform are integral to virtualization-based security. They provide the foundation upon which features like Memory Integrity operate.
Accessing the Settings Menu
To begin, you’ll need to access the Settings menu. Click on the Start Menu and select the gear icon, or simply press Windows + I together. This will open the Settings window.
Navigating to the Right Section
Once you’re in the Settings window, click on the “Apps” tab. This will open a new window with various options. On the left sidebar, you’ll see a section labeled “Optional features.” Click on it.
Finding the Features
After clicking on “Optional features,” scroll down. You’ll find a section labeled “More Windows features.” Click on it to open a new window. Here, you’ll see a list of additional features that you can enable or disable.
Enabling Virtual Machine Platform
In this list, locate “Virtual Machine Platform.” Check the box next to it. This action will enable the feature. The Virtual Machine Platform is essential for running virtual machines on your system. Moreover, it enhances the security features of Memory Integrity.
Enabling Windows Hypervisor Platform
Next, find “Windows Hypervisor Platform” in the list. Just like before, check the box next to it. This will enable the feature. The Windows Hypervisor Platform is crucial for running hypervisor-based security features, including Memory Integrity.
Applying the Changes
Once you’ve checked both boxes, click “OK.” A progress bar will appear, showing the installation process. Wait for it to complete. After the installation is done, you’ll need to restart your computer to apply the changes.
Verifying the Changes
After rebooting, it’s a good idea to verify that the changes have taken effect. To do this, go back to the “Optional features” section in the Settings menu. Here, you should see both the Virtual Machine Platform and Windows Hypervisor Platform listed as enabled features.
Method 3: Deleting the Incompatible Driver Using Windows Terminal
If you’ve tried enabling Memory Integrity and hit a roadblock, you’re not alone. One of the most common issues is the Incompatible Drivers Error. While the Group Policy Editor and enabling virtualization-based features are viable solutions, there’s another method. Specifically, you can delete the incompatible driver using Windows Terminal. Let’s explore how to do this.
Understanding the Risk
Firstly, it’s crucial to understand that this method carries some risk. Deleting drivers can affect system stability. Therefore, proceed with caution. Make sure to back up important data before taking any action.
Opening Windows Terminal
To start, you’ll need to open Windows Terminal. You can do this by searching for “Windows Terminal” in the Start Menu. Alternatively, press Windows + S and type “Windows Terminal.” Click on the app to open it.
Running as Administrator
Once the terminal window appears, make sure to run it as an administrator. This is essential for the commands to work. To do this, right-click on the Windows Terminal icon and select “Run as administrator.”
Identifying the Incompatible Driver
Next, you’ll need to identify the incompatible driver causing the issue. To do this, type the following command into the terminal:
Get-WindowsDriver -Online -All
This command will list all the drivers currently installed on your system. Look for the one that’s causing the Incompatible Drivers Error.
Backing Up the Driver
Before deleting anything, it’s wise to back up the driver. You can do this by noting down the driver details displayed in the terminal. Alternatively, you can take a screenshot for future reference.
Deleting the Driver
Once you’ve identified and backed up the driver, it’s time to delete it. To do this, type the following command:
Remove-WindowsDriver -Online -Name [DriverName]
Replace [DriverName] with the actual name of the driver you want to remove. Press Enter to execute the command.
Verifying the Deletion
After running the command, it’s important to verify that the driver has been deleted. To do this, run the Get-WindowsDriver -Online -All command again. The driver you deleted should no longer appear in the list.
Restarting the Computer
After successfully deleting the driver, restart your computer. This will apply the changes and hopefully resolve the Incompatible Drivers Error.
Enabling Memory Integrity
Now, try enabling Memory Integrity again. Go to Windows Security settings and navigate to Device Security > Core Isolation Details. Here, you should be able to enable Memory Integrity without any issues.
FAQs on Memory Integrity Incompatible Driver Issues
How do I fix incompatible drivers memory integrity?
To fix incompatible drivers that are preventing you from enabling Memory Integrity, you have several options:
- Update Drivers: The first step is to update all your system drivers. You can do this through the Device Manager or by visiting the manufacturer’s website.
- Use Group Policy Editor: Advanced users can bypass this issue by enabling Memory Integrity through the Group Policy Editor.
- Delete Incompatible Drivers: As a last resort, you can delete the incompatible driver using Windows Terminal. However, proceed with caution and make sure to back up important data first.
Why do incompatible drivers prevent using memory integrity?
Incompatible drivers can prevent the use of Memory Integrity because they don’t meet the security standards set by Windows. Memory Integrity is a part of virtualization-based security, which requires all drivers to be compatible and secure. If a driver is outdated or not secure, enabling Memory Integrity could lead to system instability.
How do I remove incompatible drivers preventing the use of memory integrity?
To remove incompatible drivers, you can use Windows Terminal:
- Open Windows Terminal as an administrator.
- Type
Get-WindowsDriver -Online -Allto list all drivers. - Identify the incompatible driver.
- Use the command
Remove-WindowsDriver -Online -Name [DriverName]to remove it. Replace[DriverName]with the actual name of the driver. - Restart your computer.
What is a memory integrity error?
A Memory Integrity error usually refers to the “Incompatible Drivers Error” that occurs when you try to enable Memory Integrity in Windows. This error means that one or more drivers on your system are incompatible with the security standards required for Memory Integrity.
Is it OK to turn off memory integrity?
Turning off Memory Integrity will reduce the level of security on your system. It’s generally not recommended unless you’re facing persistent issues that you can’t resolve. If you do turn it off, make sure to use other security measures like antivirus software to protect your system.
How do you fix memory integrity?
Fixing Memory Integrity issues involves either updating or removing incompatible drivers. You can also use the Group Policy Editor to enable Memory Integrity manually. If all else fails, consult a computer repair service in Singapore or your local area for professional assistance.
By understanding these FAQs, you’ll be better equipped to navigate the complexities of Memory Integrity and virtualization-based security in Windows 11.
When to Consult a Computer Repair Shop
Navigating the complexities of Memory Integrity and virtualization-based security can be daunting. Even with detailed guides and step-by-step instructions, you might hit a wall. In such cases, it’s wise to know when to seek professional help. Let’s explore the signs that indicate it’s time to consult a repair shop.
Persistent Errors
Firstly, if you’re facing persistent errors, it’s a red flag. You’ve tried all the methods but still encounter the Incompatible Drivers Error. In this situation, professional help can provide a way out.
System Instability
Another sign is system instability. Your computer crashes frequently or shows the “Blue Screen of Death.” These issues often require expert intervention.
Inadequate Technical Skills
If you’re not comfortable with technical tasks, don’t risk it. Deleting drivers or modifying system settings can lead to bigger problems. In such cases, it’s better to consult a professional.
Unsuccessful Troubleshooting
You’ve followed all the steps for enabling Memory Integrity. You’ve used the Group Policy Editor, enabled the Virtual Machine Platform, and even deleted drivers. Yet, the problem persists. This is a clear sign you need expert help.
Complex Issues
Sometimes, the issues are too complicated to resolve on your own. You might face problems related to Core Isolation or Windows Hypervisor Platform. These issues often require specialized knowledge.
Recommendation: VOLTA PC Upgrade & Repair in Singapore
If you’re in Singapore and looking for a reliable computer repair service, consider VOLTA PC Upgrade & Repair. They have a team of experts well-versed in resolving issues related to Memory Integrity and Windows 11. Their professional service can help you navigate the complexities of virtualization-based security features.
Address:
- Tai Seng Branch: 8 Burn Road #01-04, Trivex, Singapore 369977
- Jurong Branch: Blk 132 #01-279C, Jurong Gateway Road, Singapore 600132