Laptop Repair SG: How to put HP laptop into repair mode?

If you own an HP laptop, knowing how to put it into repair mode is crucial. Repair mode, also known as recovery environment, is a lifeline when your device encounters severe issues that regular troubleshooting can’t fix. Whether it’s a system crash, a virus attack, or software corruption, repair mode allows you to access advanced tools to restore your laptop’s functionality. This guide aims to demystify the process of entering and using repair mode. We will walk you through the reasons why it’s important, what repair mode is exactly, and provide you with a detailed, step-by-step approach to safely navigate this recovery feature. By the end of this post, you will be equipped with the knowledge to handle common laptop problems directly, potentially saving time and money on professional tech support.

Understanding Repair Mode

When you hear the term “HP laptop repair mode,” it refers to a specific recovery environment built into your HP laptop. This mode is designed to fix problems that prevent Windows from booting normally. Unlike the regular operation of your laptop, repair mode provides access to a suite of tools that help in recovering your system from serious errors.

What is Repair Mode?

Repair mode, often called recovery environment, is essential for performing advanced recovery and diagnostic tasks on your HP laptop. When your system struggles to start or runs into errors that regular troubleshooting can’t resolve, this mode becomes invaluable. It allows you to access functionalities such as restoring from a system restore point, repairing startup files, and more.

Why is it Necessary?

Understanding when and why to use HP laptop repair mode can save you a lot of hassle. It is particularly crucial when:
  • Your laptop fails to start, and all other troubleshooting has failed.
  • You encounter system errors that cannot be resolved within the normal operating environment.
  • You need to recover your system after a virus or malware attack.

Repair Mode vs. Normal Operation

The primary difference between normal operation and HP laptop repair mode lies in the level of access it provides. While normal use allows you to manage everyday tasks, repair mode delves deeper into the system’s architecture, providing tools to repair, restore, and recover the operating system. It’s like having a toolbox that comes out when things go seriously wrong, offering specialized tools designed to fix those problems.

Preparation Before Entering HP Laptop Repair Mode

Before you attempt to enter HP laptop repair mode, proper preparation is essential. This ensures that you can use the recovery tools effectively without causing further issues or data loss. Here’s how you can prepare your HP laptop for the repair process.

Back Up Your Data

Before diving into HP laptop repair mode, back up important files and data. This step is crucial because some repair options might reset your system or revert settings that can affect your files. Use an external hard drive, a cloud storage service, or any other backup method you trust to safeguard your data.

Ensure Sufficient Battery Life

Make sure your HP laptop is either fully charged or connected to a power source. Entering repair mode on a low battery can cause the laptop to shut down unexpectedly, which could further damage the system or corrupt data.

Gather Necessary Tools

If you have recovery drives or external software tools designed for system recovery, have them ready. HP laptops often come with built-in recovery solutions or instructions on how to create a recovery USB drive. Ensure you have these at hand before starting the repair process.

Check for Updates and Drivers

Sometimes, simply updating your system’s software and drivers can prevent the need for HP laptop repair mode by fixing minor issues. Before you proceed, check if there are any pending updates that could resolve your laptop’s problems without the need for extensive repairs.

Familiarize Yourself with Key Functions

Before you start, familiarize yourself with the key functions and shortcuts that help access the BIOS or boot menu. For most HP laptops, this involves pressing keys like F11 or Esc immediately after turning on your device. Knowing these in advance can save time and prevent frustration during the repair process.

Step-by-Step Guide to Entering HP Laptop Repair Mode

Entering HP laptop repair mode can seem daunting, but with the right steps, it becomes a straightforward process. Here’s a detailed guide to help you safely access the repair mode on your HP laptop.

Step 1: Restart Your HP Laptop

Begin by restarting your HP laptop. If your laptop is frozen or unresponsive, hold down the power button until the system shuts down. Then, turn it back on.

Step 2: Access the Boot Options Menu

As soon as you power on your laptop, you need to access the boot options menu. This is typically done by pressing the F11 key repeatedly as the laptop starts up. Some models may use a different key, so refer to your laptop’s manual or the HP support website for specific instructions.

Step 3: Select the Repair or Recovery Option

Once you enter the boot options menu, look for a tab or option labeled ‘Troubleshoot’ or ‘Advanced options’. Under this, you will find ‘System Recovery’ or ‘Startup Repair’. Select this to move into HP laptop repair mode.

Step 4: What to Expect on the Screen

After selecting the appropriate recovery option, your screen will display several tools and choices. Here, you can choose what kind of repair you need, such as:
  • System Restore: To restore your laptop to an earlier point when everything was working fine.
  • System Image Recovery: To restore your laptop using a specific recovery image.
  • Startup Repair: To fix problems that are preventing Windows from starting correctly.
Choose the tool that best suits the problem you are facing.

Step 5: Follow On-Screen Instructions

Once you have chosen a tool, follow the on-screen instructions carefully. Each tool will guide you through the necessary steps to repair your laptop. Be patient, as some of these processes can take time, especially if your laptop is scanning for errors or attempting to repair them.

Step 6: Reboot Your Laptop

After the repair process is complete, reboot your laptop to see if the issue has been resolved. If your laptop boots up normally, you have successfully used HP laptop repair mode to fix your system.

Navigating the HP Laptop Repair Mode Options

Once you’re in the HP laptop repair mode, you’ll encounter several tools designed to diagnose and fix different issues. Understanding these options is key to effectively using the repair mode to resolve your laptop’s problems.

System Restore

System Restore is a powerful tool that can help you return your system to a previous state when it was functioning correctly. This does not affect your personal files but it will remove apps, drivers, and updates that were installed after the restore point.
  1. Accessing System Restore: From the repair mode, select ‘Troubleshoot’ > ‘Advanced options’ > ‘System Restore’.
  2. Using System Restore: Follow the on-screen prompts to select a restore point before the issues began. Confirm your choices and start the restoration process. The laptop will restart once the process is complete.

System Image Recovery

System Image Recovery allows you to restore your entire system from a backup image. This is useful if you have a full backup of your system that was created through Windows Backup.
  1. Accessing System Image Recovery: Navigate to ‘Troubleshoot’ > ‘Advanced options’ > ‘System Image Recovery’.
  2. Using System Image Recovery: Connect the external drive containing your system image. Follow the prompts to select the image and begin the recovery. This will overwrite your current system settings and files, so it should be used with caution.

Startup Repair

Startup Repair is designed to fix certain issues, such as missing or damaged system files that might prevent Windows from starting correctly.
  1. Accessing Startup Repair: Select ‘Troubleshoot’ > ‘Advanced options’ > ‘Startup Repair’.
  2. Using Startup Repair: The tool will begin scanning your system for issues preventing your laptop from booting and attempt to fix them automatically. This process can take some time depending on the severity of the issues.

Command Prompt

For more technical users, the Command Prompt can be a useful tool to perform advanced recovery operations.
  1. Accessing Command Prompt: Choose ‘Troubleshoot’ > ‘Advanced options’ > ‘Command Prompt’.
  2. Using Command Prompt: You can execute a range of commands here to repair boot records, check disks, and more. For instance, running 
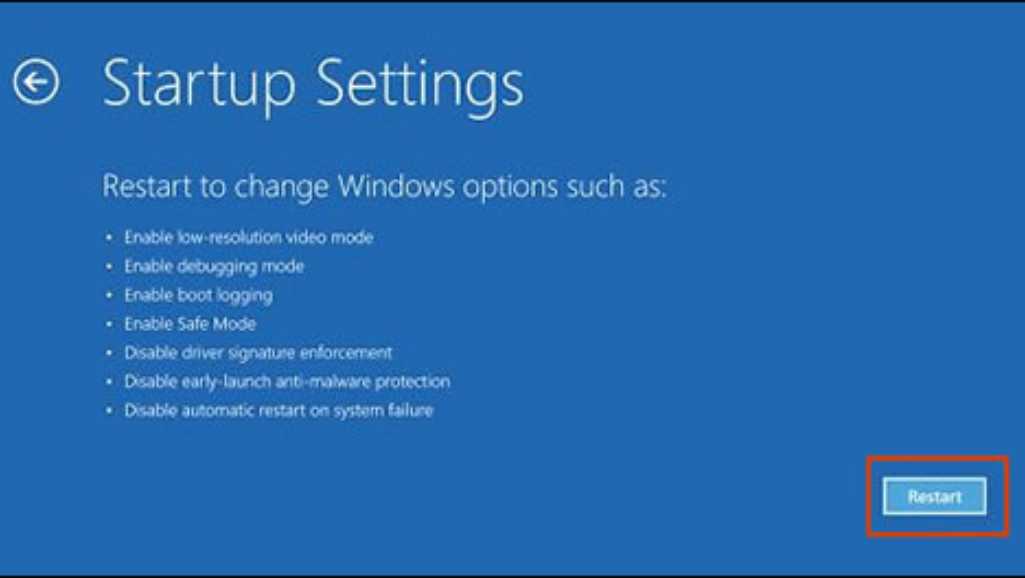
chkdsk /f /r can detect and fix disk errors, while bootrec /fixboot can help repair boot issues.

Tips for Navigating Repair Mode

  • Take Your Time: Each tool in the HP laptop repair mode has its purpose. Make sure to understand what each tool does before using it.
  • Document Your Actions: Keeping track of which tools you’ve used and what changes you’ve made can be helpful if you need to revert changes or seek further help.

Common Problems and Troubleshooting

Navigating HP laptop repair mode doesn’t always go as planned. You might encounter several common problems that require specific troubleshooting steps. Here’s how you can tackle these issues effectively.

Problem 1: Repair Mode Not Accessible

Symptom: Despite repeated attempts, you can’t seem to access the repair mode using the usual method (pressing F11 or other specified keys). Solution:
  • Check BIOS Settings: Restart your laptop and enter BIOS by pressing F10. Ensure that the boot options are configured correctly and that the system recovery from the dedicated recovery partition is enabled.
  • External Keyboard Issues: If you’re using an external keyboard, try using the laptop’s built-in keyboard to enter the boot options, as some external keyboards might not be recognized during the boot sequence.

Problem 2: System Restore or Image Recovery Fails

Symptom: System Restore or System Image Recovery attempts fail, and the laptop either reboots without any change or provides an error message. Solution:
  • Check Disk Space: System Restore and Image Recovery require sufficient disk space to operate. Make sure your HP laptop has enough free space on the hard drive.
  • Verify the Health of Your Hard Drive: Use the Command Prompt in repair mode to run chkdsk /f /r to check for and fix disk errors, which might be causing the restore to fail.

Problem 3: Startup Repair Couldn’t Fix the Problem

Symptom: After running Startup Repair, the tool reports that it couldn’t fix the problem, and the laptop remains unbootable. Solution:
  • Use Command Prompt for Manual Repair: Access the Command Prompt and run commands like bootrec /fixboot or bootrec /rebuildbcd to manually rebuild the boot configuration data which might solve the startup issue.
  • Consider Professional Help: If manual interventions via Command Prompt do not resolve the issue, it may indicate deeper hardware or software problems that require professional diagnostics and repair.

Problem 4: Errors When Running Command Prompt Commands

Symptom: You receive errors when trying to execute commands in the Command Prompt, suggesting issues with the commands or underlying system components. Solution:
  • Ensure Correct Syntax: Double-check the syntax of your commands. A simple typo can cause commands to fail.
  • Run as Administrator: Make sure the Command Prompt is running with administrative privileges to allow full access to all commands and their functions.

Problem 5: Repair Processes Take a Very Long Time or Hang

Symptom: Repair tools or processes are extremely slow, or seem to hang without completing. Solution:
  • Patience is Key: Some repair processes, especially those involving disk checks or large system restores, can take a long time. Allow ample time for processes to complete.
  • Check System Health: If processes consistently hang, this could indicate failing hardware, such as a bad hard drive. Running hardware diagnostics from the BIOS menu or consulting with a professional can provide further insights.

Exiting HP Laptop Repair Mode

Exiting HP laptop repair mode properly is crucial to ensuring that any changes you made take effect and that your laptop returns to normal operation without issues.

Step 1: Finish Your Repairs

Make sure you have completed all necessary repairs and have closed any tools or programs that were open in repair mode. Double-check that all processes have finished running and that there are no pending tasks.

Step 2: Choose the Correct Exit Option

From the options available in the repair mode:
  • Select ‘Continue’ to Exit and Restart Windows: This will close the repair mode and attempt to restart your laptop normally.
  • Select ‘Turn Off Your PC’ if Further Work is Needed: If you believe further repairs or a professional evaluation is required, it’s safer to turn off your laptop to prevent potential data loss or damage.

Step 3: Restart Your Laptop

After selecting the appropriate exit option, your laptop should either shut down or reboot. If you chose to restart:
  • Monitor the Boot Process: Watch as your laptop boots up to ensure it loads the operating system correctly.
  • Check for Normal Functionality: Once logged in, verify that the issues have been resolved and that the laptop is functioning as expected.

Step 4: Create a Recovery Point

After a successful repair and return to normal operation, consider creating a new system restore point. This will help you in the future if new issues arise, allowing you to return to a known good state.

Tips for Safe Exit

  • Do Not Force Shutdown During Restart: Forcing your laptop to shut down while it is trying to restart can corrupt data and cause further issues.
  • Run a Final System Check: Consider running a quick system check or diagnostic tool available in your operating system to ensure everything is functioning properly.

Maintenance Tips to Avoid Frequent Repairs

Regular maintenance of your HP laptop can prevent many common problems that often necessitate repairs. Here are some essential tips to keep your laptop in top condition and reduce the likelihood of issues.

Keep Your System Updated

  • Regular Updates: Always ensure your operating system and all installed software are up to date. Updates often include patches for security vulnerabilities and fixes for known bugs that can prevent future problems.
  • Driver Updates: Keep your hardware drivers updated. This ensures that all components work efficiently and can prevent hardware-related issues.

Use Antivirus and Anti-Malware Software

  • Protection Software: Install reliable antivirus and anti-malware software to protect your laptop from malicious attacks that can cause serious damage.
  • Regular Scans: Schedule regular scans to detect and remove any threats before they can cause harm.

Clean Your Laptop Regularly

  • Dust and Debris: Regularly clean out dust and debris from your laptop’s vents and keyboard to prevent overheating and other mechanical issues.
  • Professional Cleaning: Consider a professional service for a thorough internal cleaning every couple of years, depending on your usage environment.

Monitor System Health

  • Diagnostic Tools: Use built-in or third-party diagnostic tools regularly to check the health of your laptop’s hardware.
  • Early Detection: Pay attention to signs of malfunction, such as frequent crashes, slow performance, or unusual noises, and address them promptly.

Backup Your Data

  • Regular Backups: Regularly back up your data to an external drive or cloud storage. This ensures that you can easily restore your information if something goes wrong.

Manage Battery Life

  • Battery Care: Avoid leaving your laptop plugged in all the time. Try to cycle the battery from full to around 20% occasionally to prolong its life.
  • Energy Settings: Utilize energy-saving settings to maximize battery health and efficiency.

Conclusion

Navigating through the repair mode of an HP laptop is a crucial skill for any laptop owner. It provides a safety net for when things go wrong, from minor glitches to major system failures. We’ve covered how to prepare your laptop for repair, enter repair mode, use the available tools effectively, and exit safely. We also discussed common troubleshooting steps for typical issues you might encounter and offered maintenance tips to help avoid frequent repairs. By understanding how to access and utilize the HP laptop repair mode, you can save time and possibly avoid the cost of professional repairs. Remember, the key to laptop longevity is regular maintenance and prompt attention to problems as they arise. With the right care, your HP laptop can serve you well for many years.

Are you facing technical difficulties with your HP laptop?

Don’t let these problems slow you down. Reach out to the experts at Volta PC Upgrade & Repair for reliable, professional assistance. Our team of skilled technicians specializes in diagnosing and resolving all types of laptop issues quickly and efficiently. Whether it’s a software hiccup or hardware malfunction, Volta PC Upgrade & Repair is here to help restore your laptop to peak performance. Contact us today and experience the peace of mind that comes with professional laptop repair in Singapore. Still dealing with persistent laptop issues? It’s time to call in the professionals at Volta PC Upgrade & Repair. We understand how crucial a functioning laptop is to your daily life, which is why we offer comprehensive repair services to tackle even the toughest of problems. Don’t waste any more time on frustrating DIY fixes—let Volta PC Upgrade & Repair get your HP laptop back in top shape. Get in touch now and let us take care of the rest!
  • Address:
    • Tai Seng Branch: 8 Burn Road #01-04, Trivex, Singapore 369977
    • Jurong Branch: Blk 132 #01-279C, Jurong Gateway Road, Singapore 6001324
  • ContactWhatsapp us | Call 69500453 | Telegram us
X